When it comes to communications systems for your UTV, you really only ever hear of two names in the industry: Rugged Radios and PCI Race Radios. While those two communications companies have solidified their footholds in the industry, there have been several new companies entering the UTV car-to-car and in-car communications market. Today we’re looking at car-to-car, in-car, and handheld radio options that you might be considering from NavAtlas.
Disclosure: I reached out to NavAtlas about their products they agreed to ship us a complete kit that you will see in this review. We have not been compensated for this review, but we do get to keep the product. Our reviews are fully independent and our views are our own. NavAtlas did not receive prior access to this review, nor did they provide any editorial requirements. We completely respect and value our partners, and our viewers, and try to provide completely independent experiences and opinions for our industry. If you have any questions or concerns, please Contact Us.
Product Overview
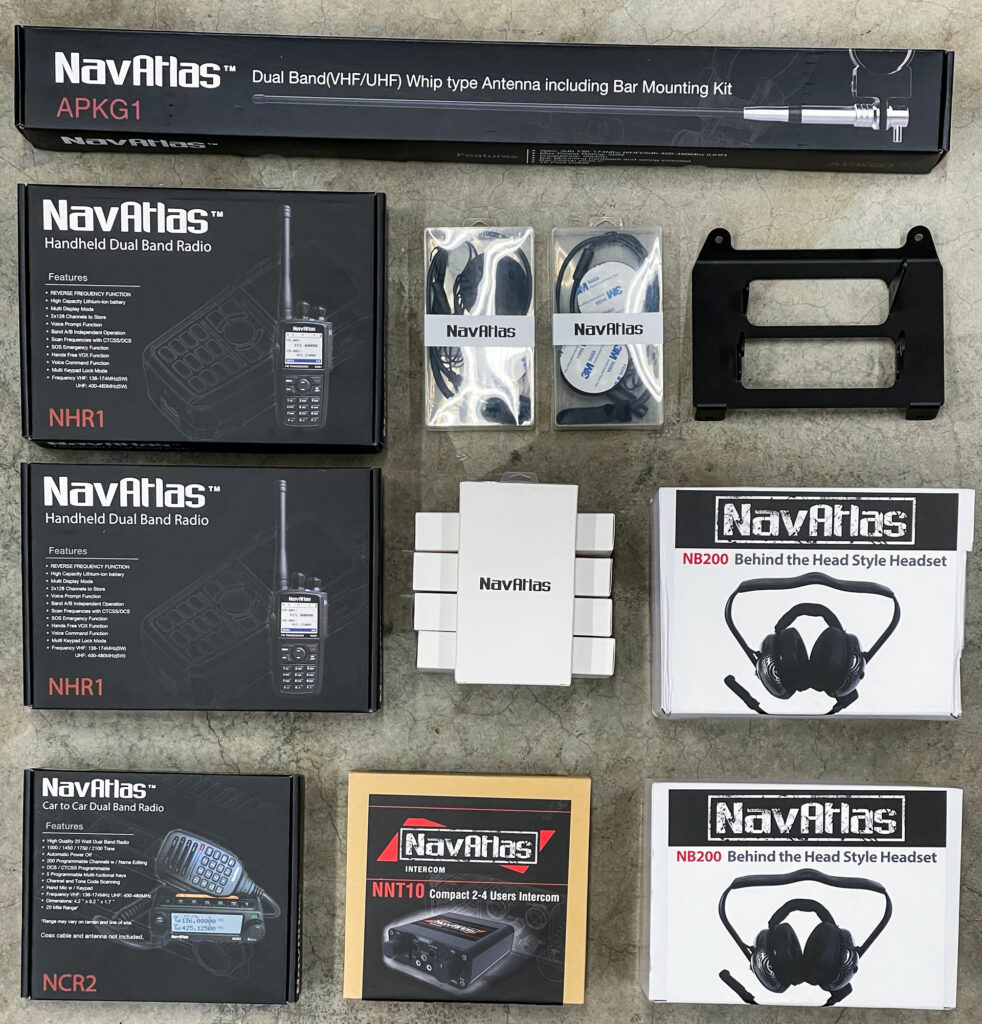
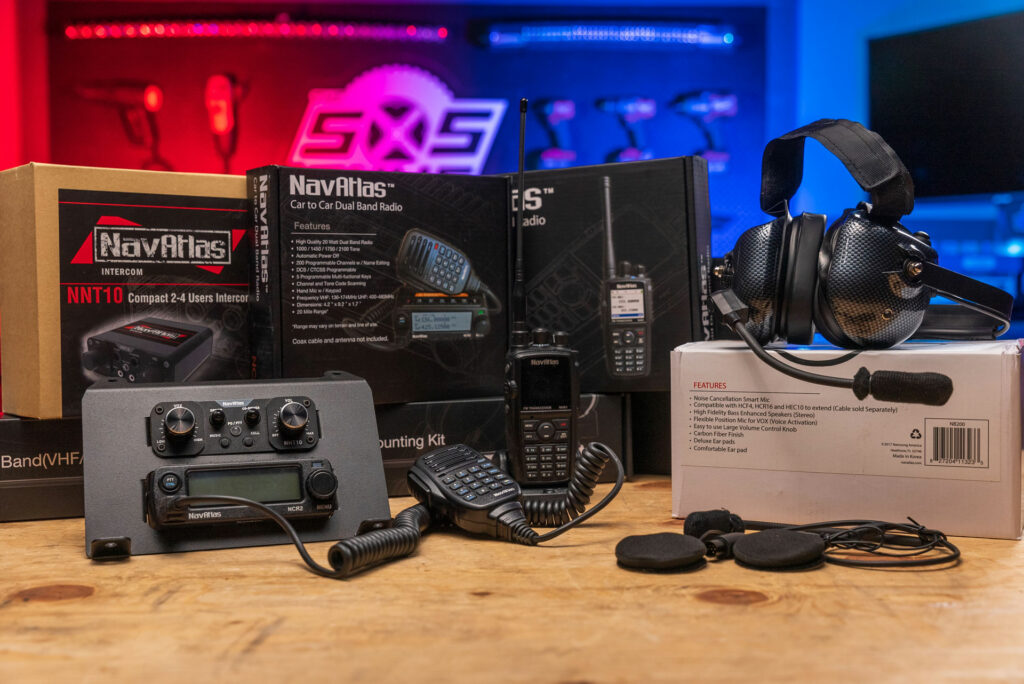
NavAtlas offers several radio solutions for everyday use for various types of vehicles. NavAtlas was kind enough to send us a complete kit for #UncleBen’s RZR XP Turbo and handhelds to test out.
NavAtlas NCR2 Mini Mobile Radio
To start things off we have the NavAtlas NCR2 mini mobile radio. The NCR2 is a 20-watt dual-band radio capable of operating at 136-174MHz in the VHF frequencies and 400-480MHz in the UHF frequencies. These ranges are in line with other dual-band radio options on the market and match other NavAtlas radios. Not all frequencies are transmittable per federal regulations (ie: some frequencies are listen-only). The great thing about radiofrequency regulations and analog radio technology is that if your buddy has a radio on these frequencies, you can communicate between different brand radios, just as long as you’re not trying to co-mingle digital or proprietary coded transmission technologies.
NavAtlas NCR2 Specs
- Listed output of 20 watts
- 136-174MHz VHF capable
- 400-480 MHz UHF capable
- 200 programmable channels
- Hands-free VOX capable
- CTCSS, DCS, 2Tone, and 5Tone compatible
- Programmable multi-function keys
- Small footprint of 4.21” x 4.92” x 1.77”
- Multi-row backlit LCD screen
- Surface-mount bracket included
- In-line (harness) glass barrel fuses (2 * F20AL250V, 1 * F5AL250V)
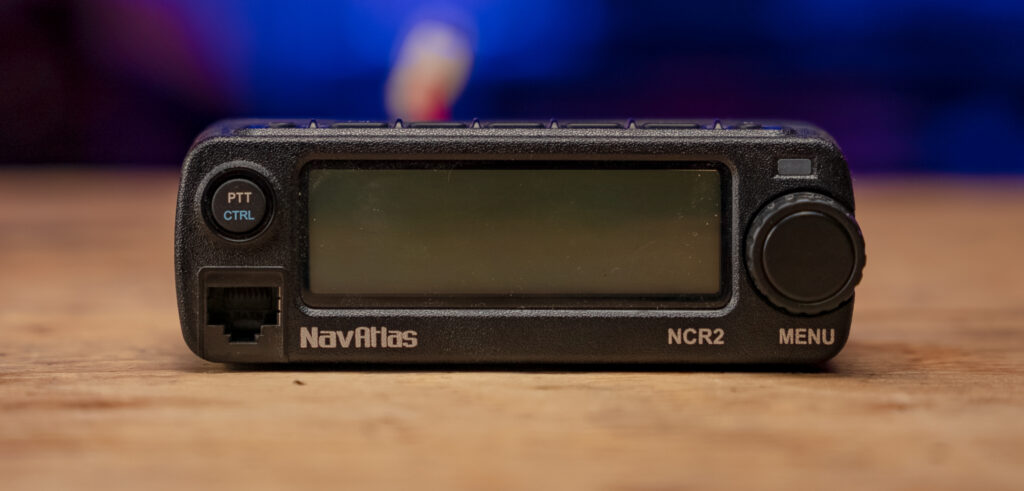
On the front of the NCR2 radio, you have a dual-row graphic LCD display with a backlight, an RJ-45 connection for your handheld microphone/speaker/keypad, a PTT/CTRL button, and a Menu scroll knob for selecting menus, setting volume, etc. This knob also acts as a push-button for selections. There is also an LED that glows green upon a receipt of transmission or red when you are transmitting.
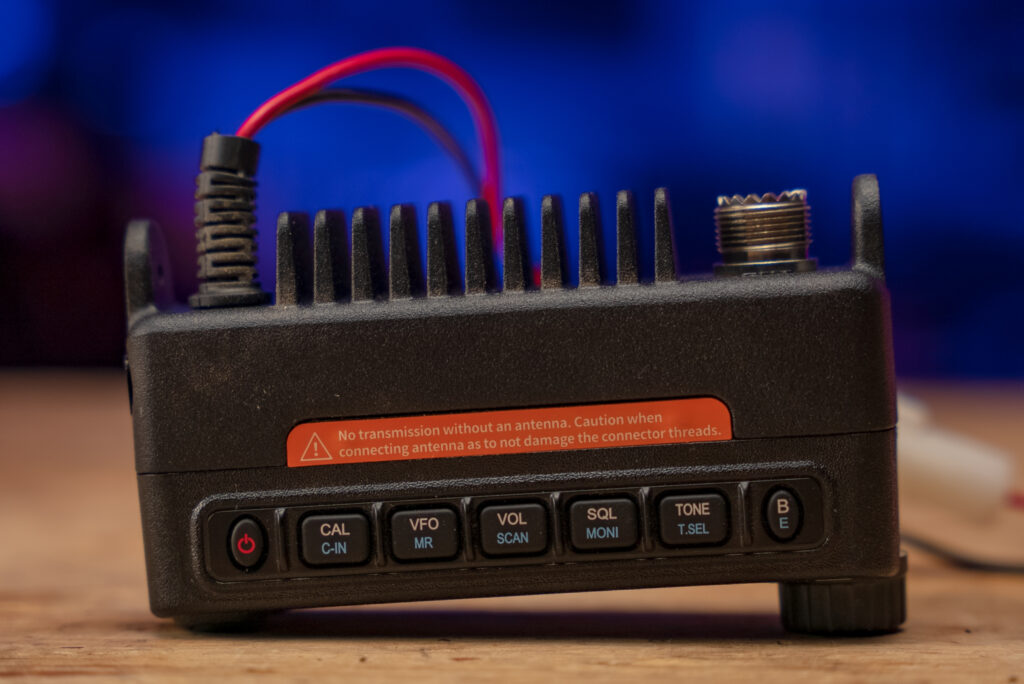
On top of the radio you have a row of seven buttons:
- Power On/Off – Turns the unit on and off
- CAL/C-IN – Channel call-up and VFO channel control
- VFO/MR – Select the display of, or store as the default call channel/mode
- VOL/SCAN – Sets scroll knob as volume, can double press to mute radio, or long-press to scan frequencies
- SQL/MONI – Set squelch of the current channel, or disable squelch and monitor channel
- TONE/T.SEL – Select CTCSS/DCS, or in VFO mode selects between VHF/UHF
- B/E – Back menu button, or press and hold to lock interface
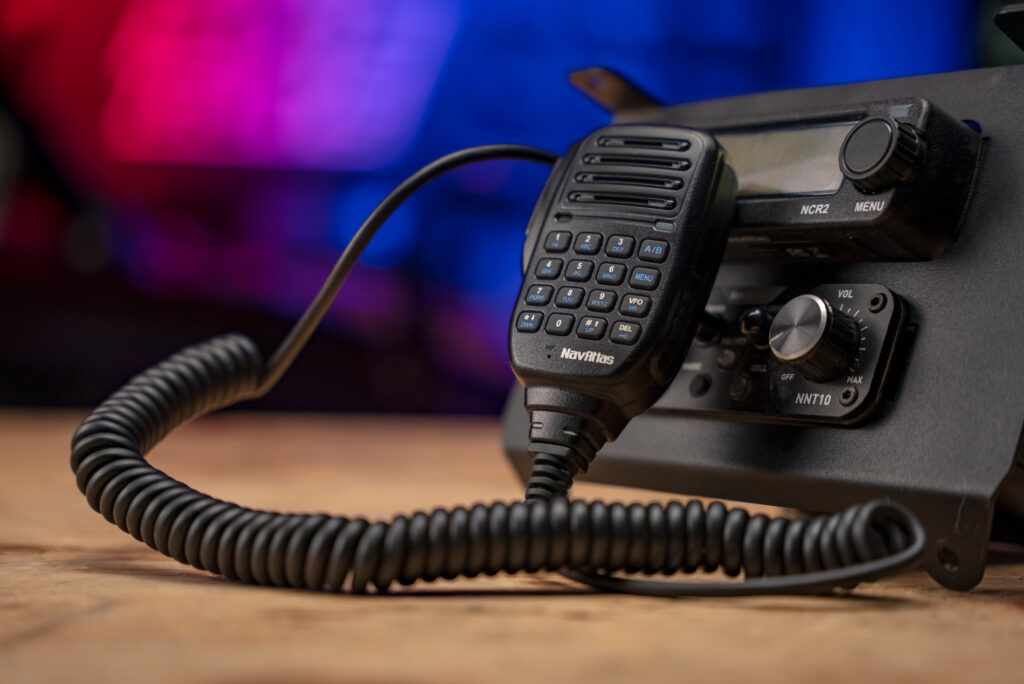
The NCR2 radio also includes a plastic handheld communications speaker/microphone with a full 12-key dial pad and menu selection buttons replicating most of the on-unit functionality. The handheld also includes status LEDs that mimic the on-unit status LEDs. This has a reasonable length of spiraled cable that will connect to the NCR2 via the front RJ-45 communications jack. There is no clip or mount for this handheld unit.
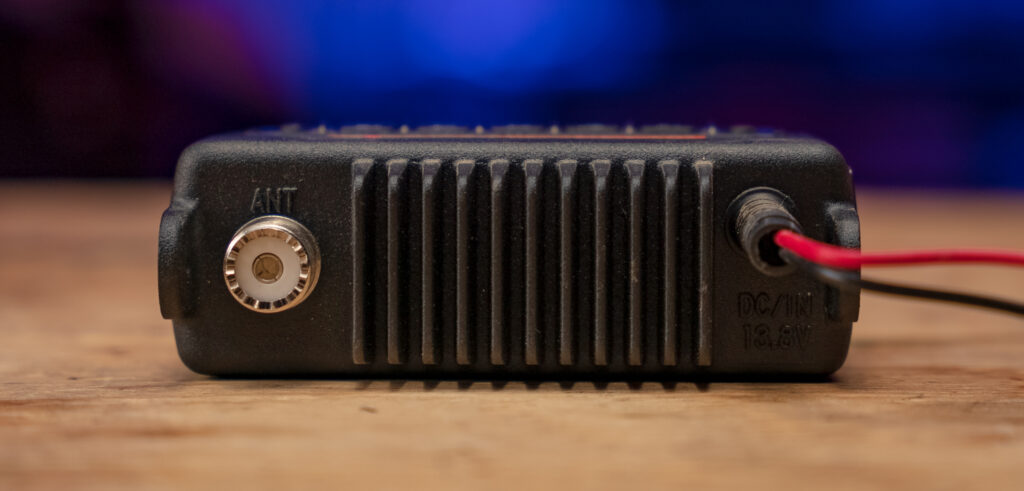
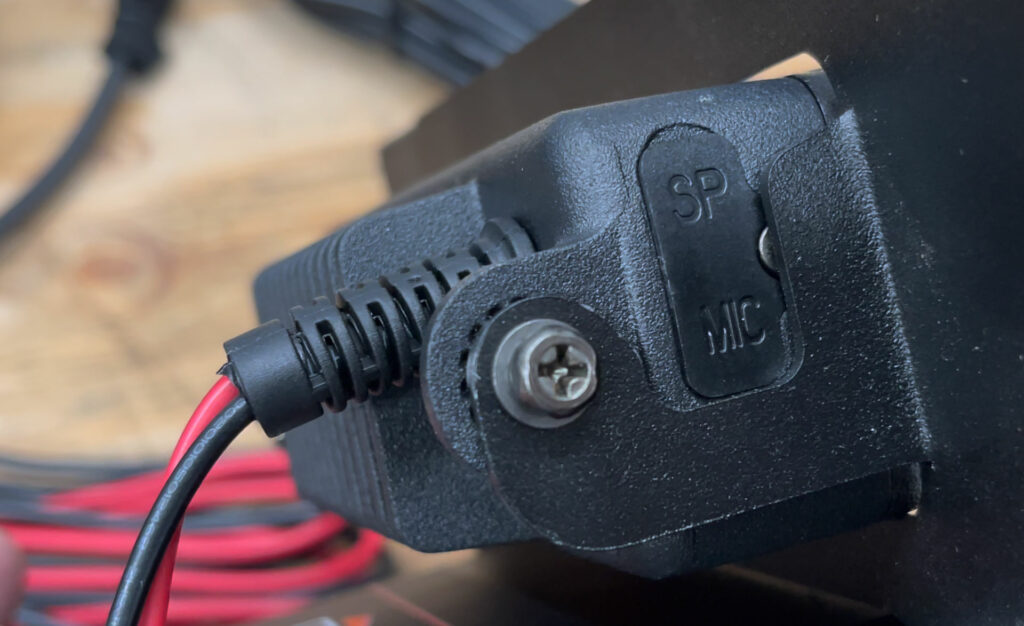
On the back of the NCR2 radio, you have a single RG8 connection for your antenna cable (antenna and cable not included with radio) and a DC power lead. On the left-hand side of the unit, there is a 2.5/3.5mm K-type connector for connecting an external microphone and/or speaker. This is covered by a plastic plate that is fixed in place by a small Philips screw. That’s all there is to the NCR2 radio. It is very small and compact and honestly could fit anywhere on a UTV including roof mounts or custom cut dash mounts.
NavAtlas NNT10 In-Car Intercom
Next up we have the NNT10 in-car communications unit. This unit is specifically for the communications of the driver and co-driver (passenger) of the vehicle. By itself, this unit cannot broadcast to, or receive from, another mobile radio. The NNT10 is purely for in-car headset to headset communications. There is also an NNT20 unit that is 50mm wider but also 10mm shorter. This is a better option for those making custom dashes, want a shorter profile, or want more room around the knobs for easier operation with gloves. Both units include a surface-mount bracket.
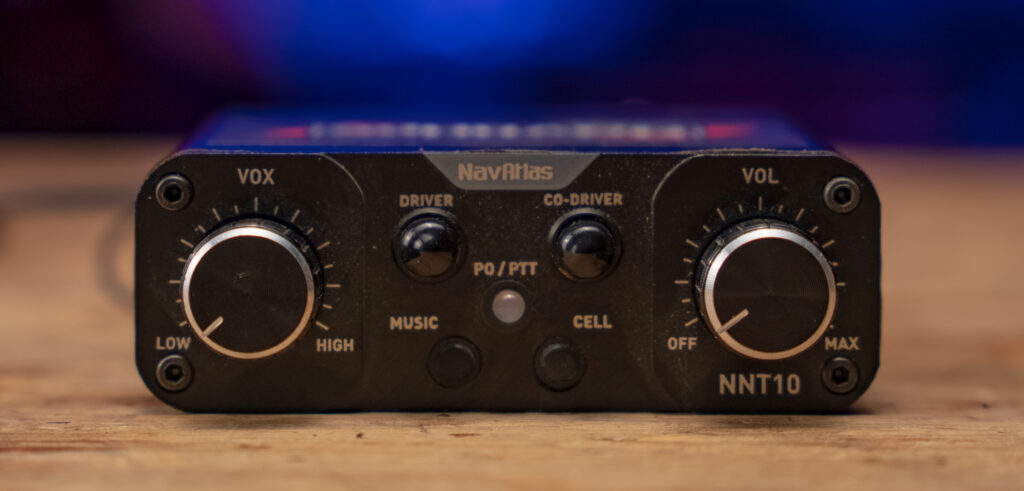
On the front of the NNT10/NNT20 you will find:
- A master volume knob that also acts as your On/Off switch
- Driver and co-driver headset jacks
- A 3.5mm TRS jack for playing music through your headsets
- A 3.5mm TRRS jack for universal phone talking/listening
- Power/PTT LED that shows blue when powered on, red when PTT is engaged
- VOX knob sets your voice activation sensitivity, so you don’t have to push a PTT button to engage the microphones.
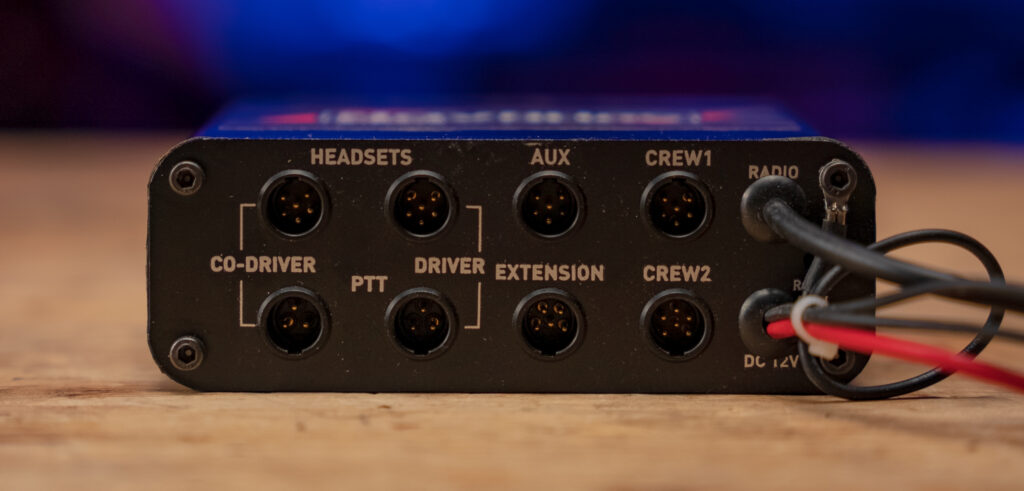
On the back of the NNT10/NNT20 you will find:
- Headset jacks for both the driver and co-driver
- Two PTT jacks for the driver and co-driver
- Two headset jacks for Crew 1 & 2; these are for two additional passenger headsets like in a four seat UTV. These two jacks are only able to listen and do not have a PTT to engage a microphone nor a microphone circuit; only the driver and co-driver get a PTT jack and microphone circuit.
- An AUX jack for connecting the optional NavAtlas RTA3 cable that gives you stereo RCA audio inputs (ie: stereo head unit auxiliary output).
- An Extension jack is undefined and not used in any of the wiring diagrams.
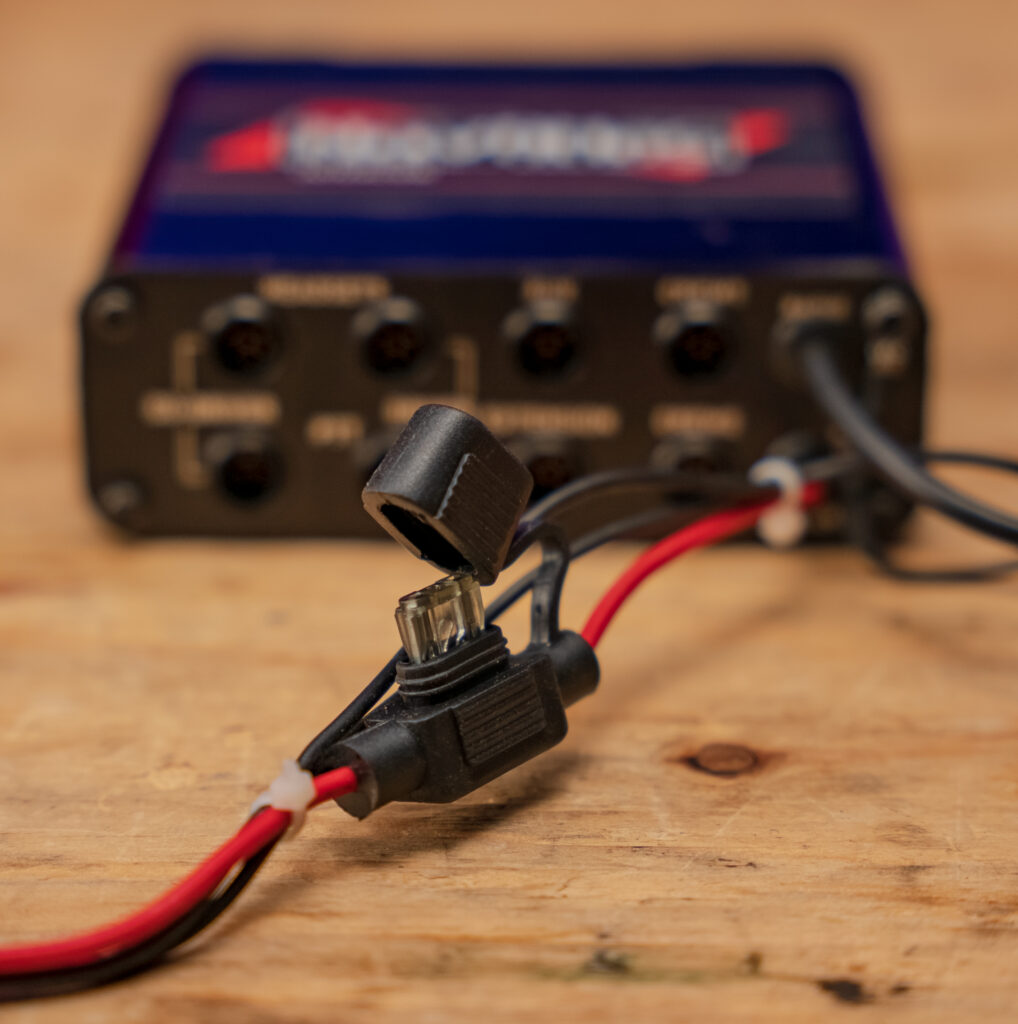
- A power/ground lead with 2 amp in-line standard automotive blade-style fuse.
- A hard-wired radio connection jack which requires the NavAtlas RTi300 adapter cable to integrate the NCR2 radio.
The NNT10/NNT20 coms units are rated to put out 80mW per headset at 32 Ohm. Microphone inputs expect a 150 Ohm at 0.25V with a dynamic range of 20mV to 1.5V. If none of that made sense to you, it just means that you’ll want to stick to NavAtlas brand headsets. Not only are the connections not standard across manufacturers, but you also will not be powering a high-end headset that would use a condenser microphone and/or high output earphone drivers that might feature ANC (active noise cancelation).
NavAtlas BCRZR11 Installation Bracket
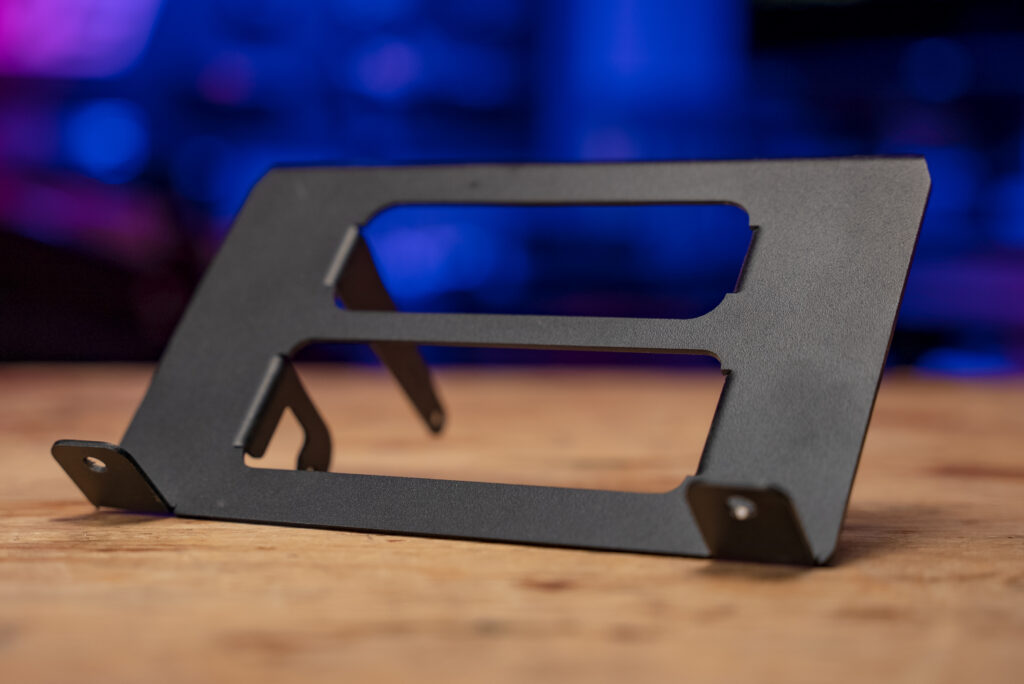
This full-install kit also included the NavAtlas BCRZR11 Radio/Intercom Glovebox Bracket, even though it’s for the center cubby (not the glovebox). This allows the NCR2 and NNT10 to be mounted together into the cubby located in front of our RZR’s shifter below the center dash. Installation is straightforward:
- Remove the existing cubby by removing the single screw holding it in place (located behind it, under the dash).
- Mount both the radio and intercom units to the bracket with the included Phillips screws. There are no alignment options built into the housing.
- Place the bracket, containing the radios, into the cubby and use the four included self-tapping screws to secure the bracket to the cubby’s front fascia.
NavAtlas APKG1 Antenna Kit
NavAtlas sent us their APKG1 Dual Band “Whip Type” Antenna Kit which includes mounts and cable. I put “Whip Type” in quotes because the included ANT101 antenna is not flexible at all. It is very rigid and measures 27.5” long. Take this into consideration if you plan on possibly impacting branches or other low-hanging obstacles. There is no frequency specs on the antenna to know what it’s optimized for and because it is not a single length of wire like a traditional “whip type” antenna, you can not trim the length of this antenna to optimize for your preferred frequencies.
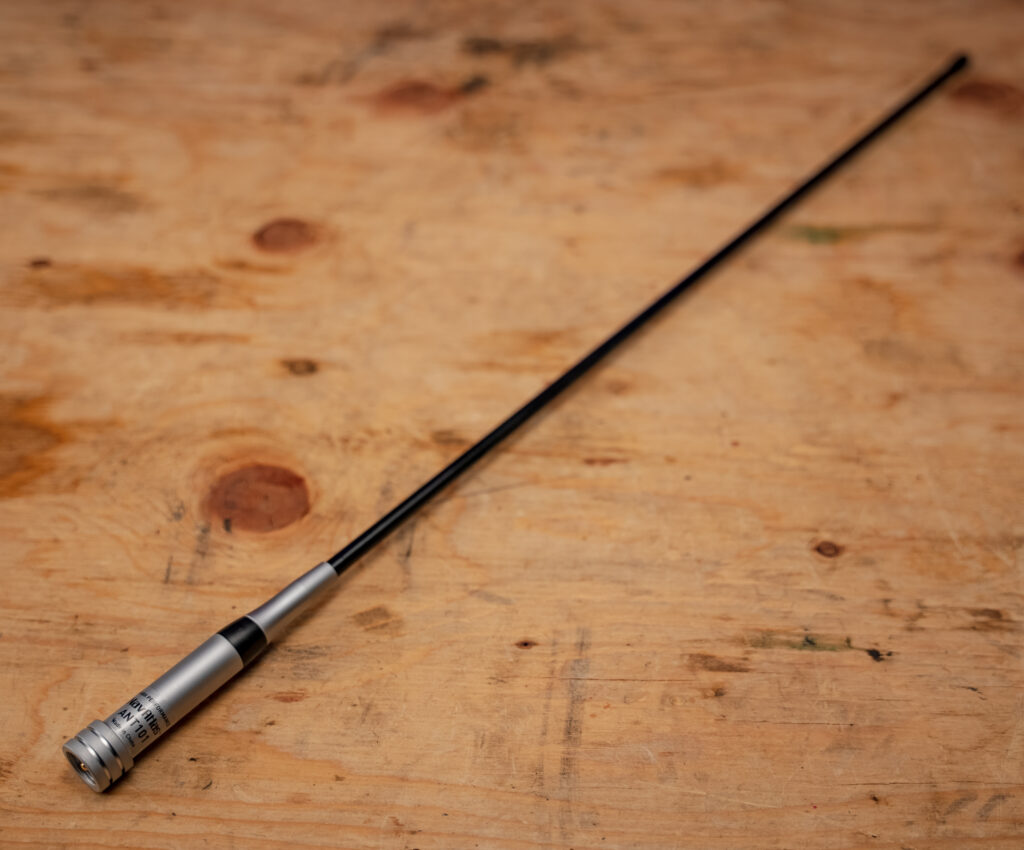
Included with the antenna kit was a 1.75” bar mount but it does not allow for angle adjustment. Your antenna will simply be 90° perpendicular to the cage bar you mount it to. NavAtlas also includes an “L” bracket for mounting to a roof or flat surface like a bed rail. Also included in this kit was around 16’ of antenna cable with one end featuring a right-angled female connection, perfect for mounting on a roll cage. Once your cable is attached to the mount, you simply thread the antenna onto the RG8 connection. Unfortunately, the NavAtlas ANT101 antenna does not have flat sides to use a wrench on so you will have to rely on your hand strength to secure the antenna and hope it doesn’t rattle off.
NavAtlas NB200 Behind-the-Head Headset
NavAtlas sent us two of their NB200 behind-the-head style headsets. These headsets look like some other headsets on the market but have a few differences.
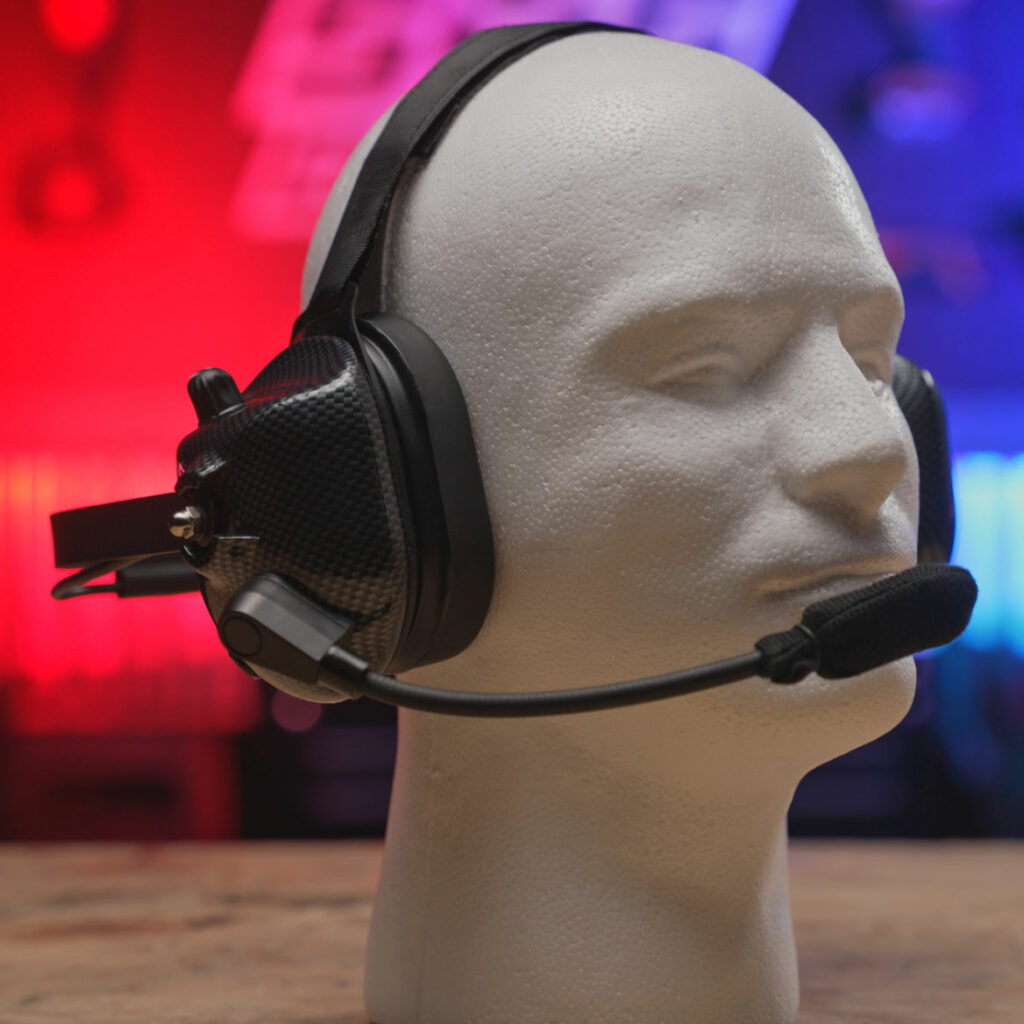
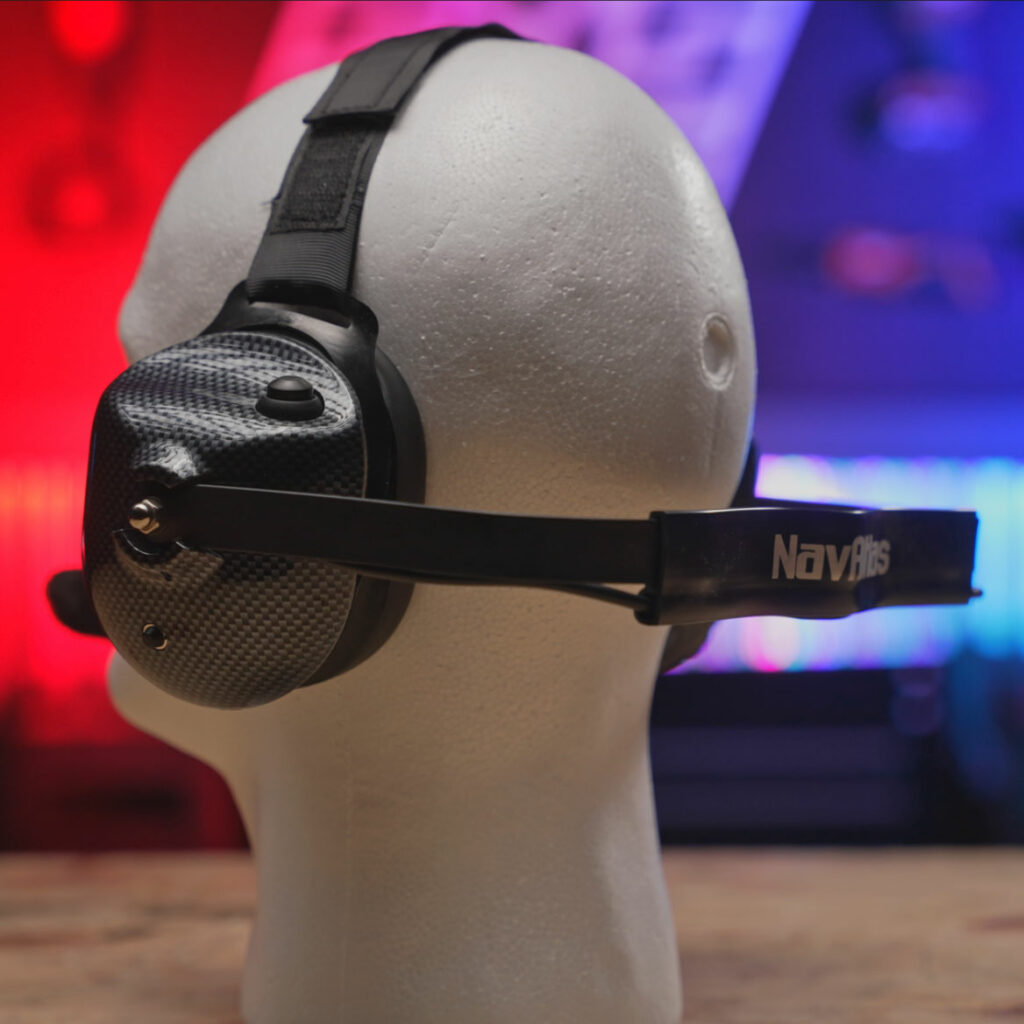
The NavAtlas NB200 headsets feature a large compression yolk that goes behind your head/neck. This is what also carries the audio cable to the far side of the headset. What keeps the headset on your head is an adjustable hook and loop strap that goes over your head. This style of headset is supposed to keep the weight of the compression yolk lower, create a more comfortable fit as the strap fits the shape of your head, and provide a better overall experience while riding.
The ear cups have a stylish carbon fiber water-transfer design, an around/over-ear style cup, and a vinyl coating on the ear cup foam. There is no airflow through the ear cups, but the sealed nature assists in keeping the engine and environmental noise out.
The outside of the right ear cup features an easily indexed volume knob and a boom microphone. The microphone is adjustable, firm, and stays in place. The microphone comes with a simple cloth sock-like windscreen that is held into place with a rubber band. These are easily removed for washing… but also for losing!
On the outside left ear cup, you’ll find an easily indexed PTT (push to talk) button. This allows you to bypass the NNT10 and engage the transmission of the NCR2 mobile radio.
NavAtlas NH100 In-Helmet Headset
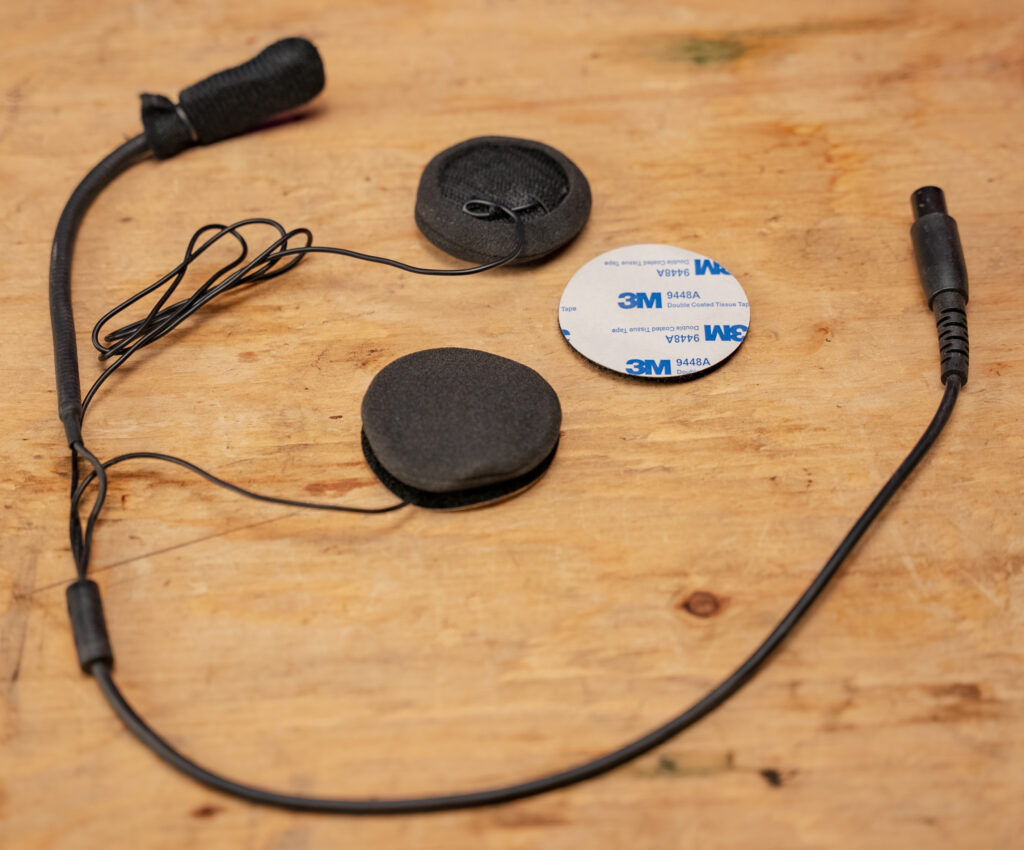
One accessory you may consider purchasing is the NH100 headset for inside your helmet. This gives you speakers for both sides of the helmet and a boom mic to route into the chin bar. You will need a separate extension cable to reach the radio connections but allows you to use your full-face or open-faced helmet with your NavAtlas comms system.
NavAtlas NHR1 Handheld Radio
To round out this review, NavAtlas sent out a pair of their NHR1 handheld radios as well. The common situation is that many times you want to have a spotter guide you through the rocks and obstacles, or simply allow the family to communicate back to the vehicle while on a hike or at play.
NavAtlas NHR1 Specs
- Listed output of 5 watts
- 136-174MHz VHF Capable*
- 400-480 MHz UHF Capable*
- 128 Programmable Channels per Band
- Hands-Free VOX Capable
- CTCSS & DCS Capable
- FM Radio Receiver Mode
- 12-Key Keypad with Lockout
- Full-Color Backlit Screen
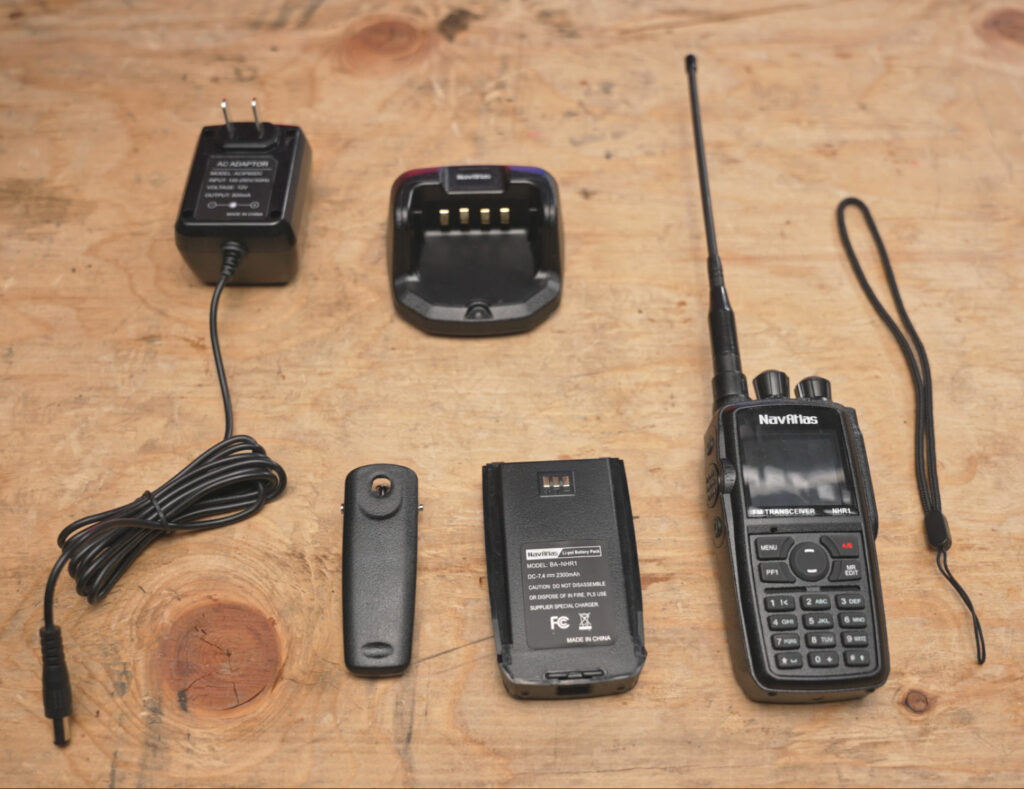
- Included belt clip and hand tether
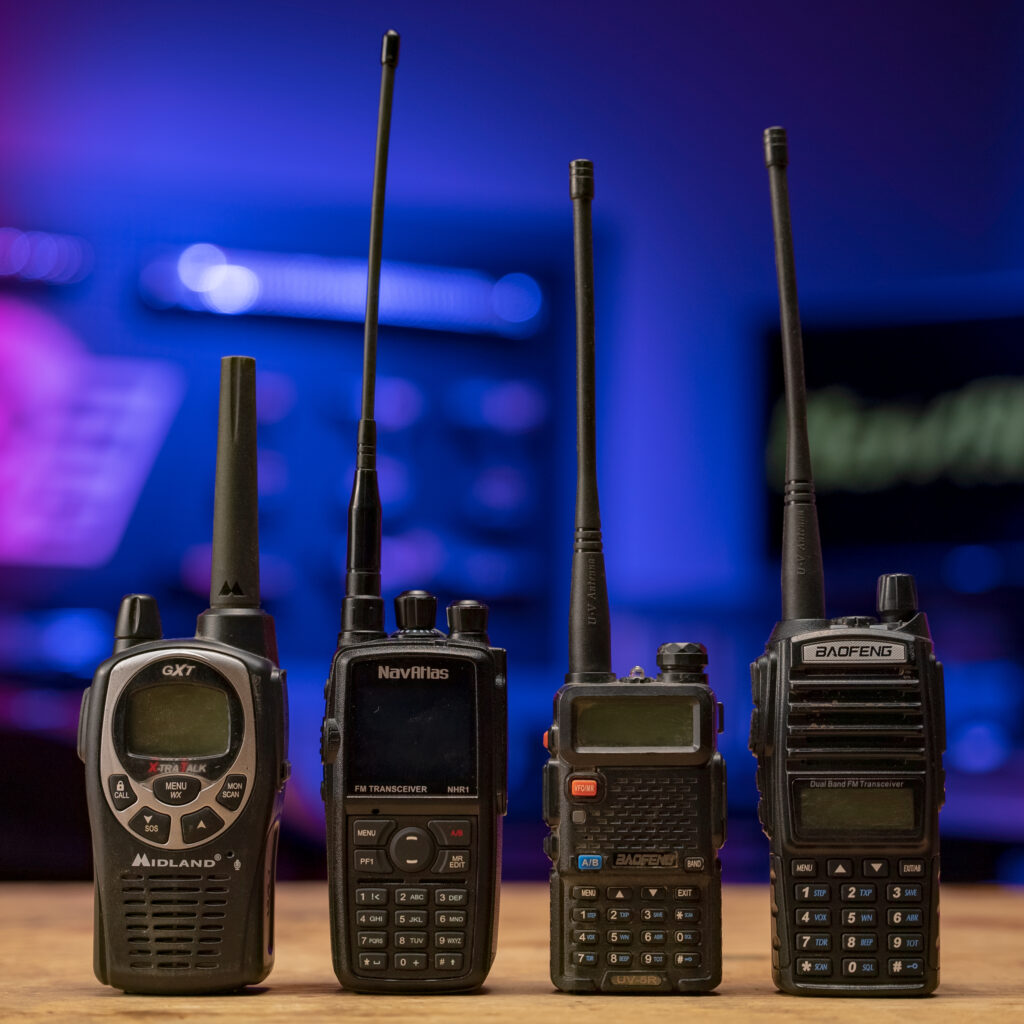
The NHR1 handheld radio is a moderately sized radio with a standard 8” antenna. The antenna is an SMA-Male connection with the radio being the corresponding SMA-Female connection. This is a standard connection in the radio industry but is backward from other popular radios on the market. If you were planning on using an aftermarket Nagoya or similar antenna that you might have laying around, you will need to check the male/female connections of your unit.
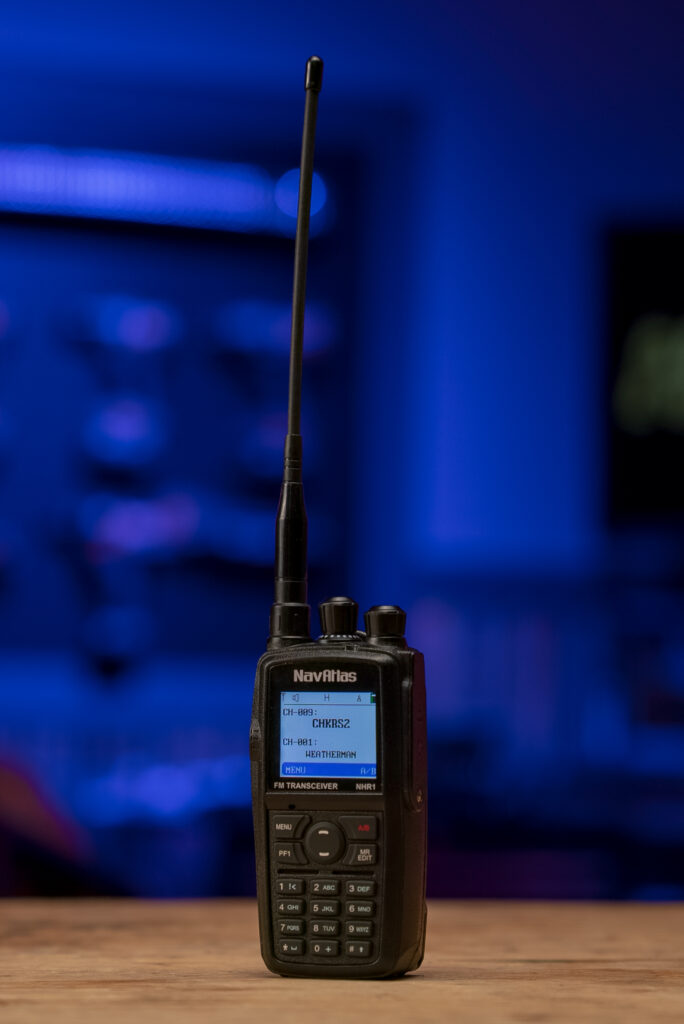
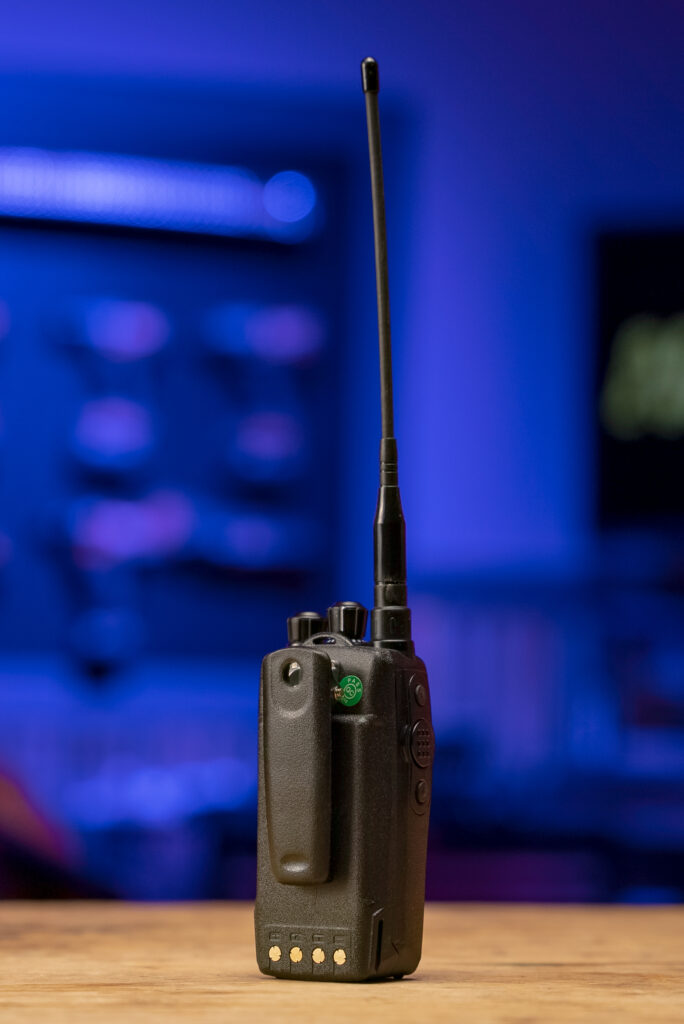
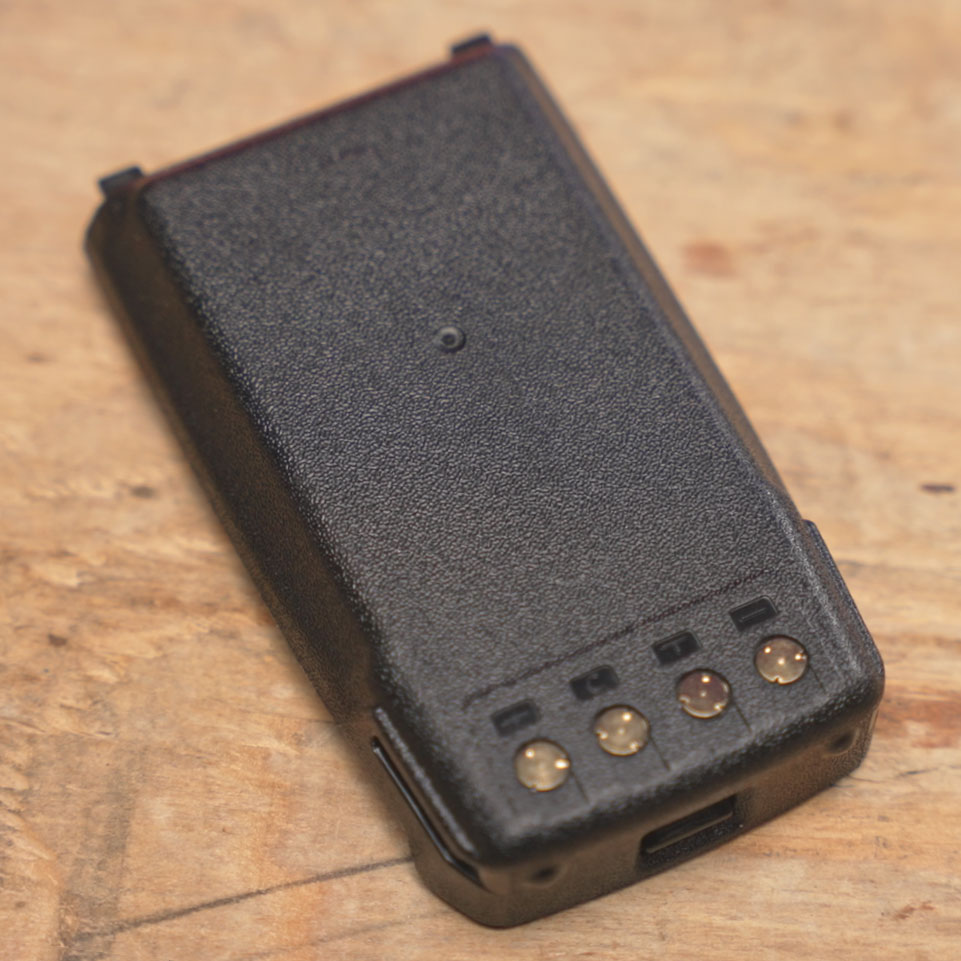
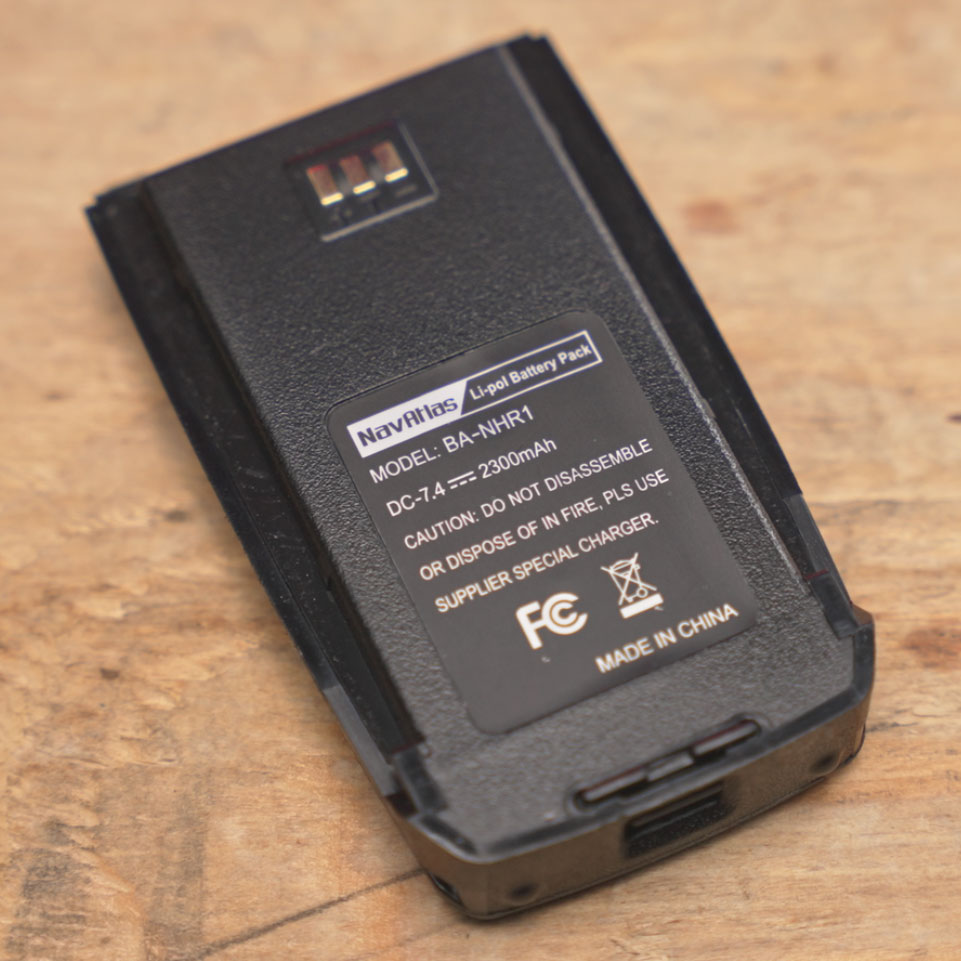
The NavAtlas NHR1 includes a locking BA-NHR1 2,300 mAh lithium-polymer battery and includes a charging station with a wall-wart. Like most other handheld radios, this battery will take some time to charge as it is a slow battery tech. This isn’t a bad thing, but in the age of fast-charging cellphones, remember to charge the radios the night before your next adventure.
NavAtlas Installation
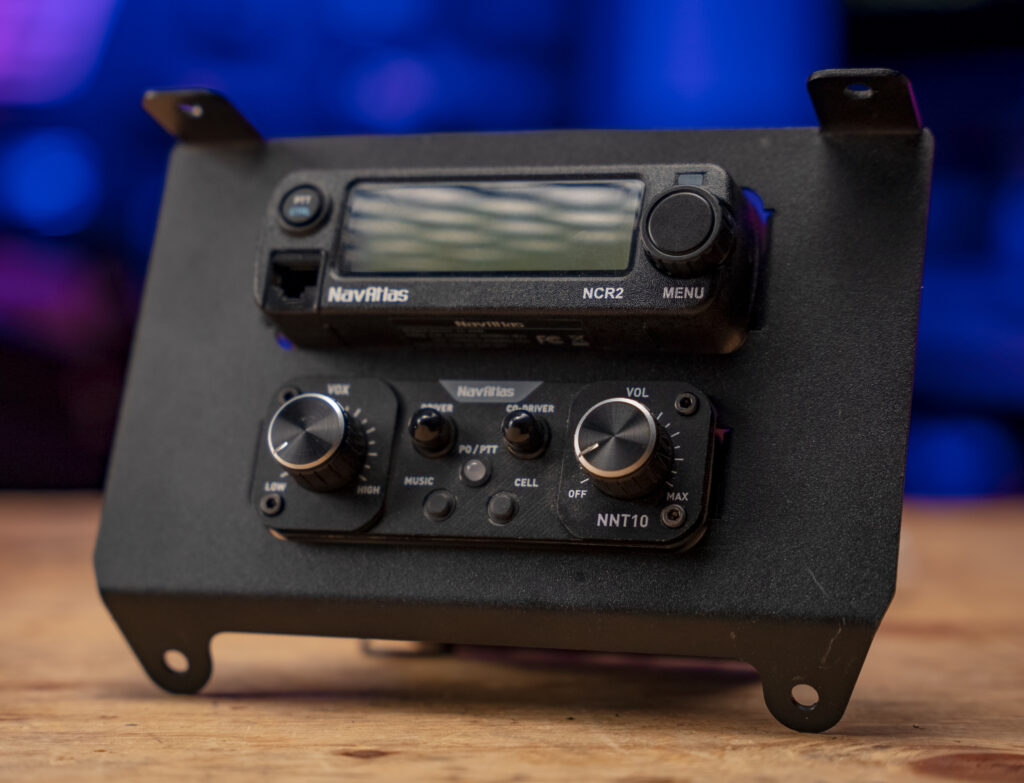
Installation of the NavAtlas radio and comms system was straightforward. Mount both the NCR2 radio and NNT10 comms to the provided BCRZR11 plate with the provided screws. Then move on to running the provided NCR2 power leads directly to the battery as recommended by NavAtlas to reduce noise. In our case, we ran them through the center chase with the rest of the Polaris wiring, through the firewall via a new grommeted hole, and then finally to the radio. There was no cutting required and the length left minimal length to zip-tie within the dash. The comms power we routed to our RearLightBar Pro8 switching system which is routed directly to the battery as well. This gives us the ability to switch the NNT10 unit on/off externally and also allows it to automatically turn on using the Pro8’s memory function.
Connecting the NNT10 comms to the NCR2 radio was something unexpected if you’re used to working with other brand radios. The NNT10 comes with a radio interface cable hardwired but requires an adapter cable to connect to the NCR2. This is the same type of two-pronged cable that you would use to connect a headset to a handheld radio.
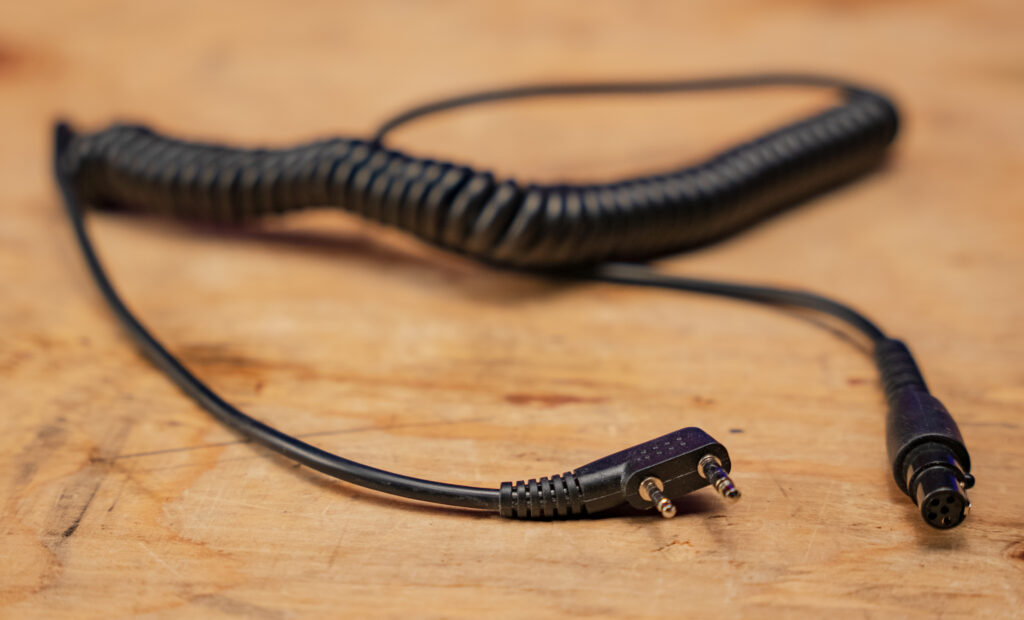
Ultimately this does a few things… First, it creates a new set of connections to come loose, corrode, short, or otherwise become another guessing game in troubleshooting. Second, it adds a bulk of cable behind the radios reducing airflow and creating additional cable clutter. Third, this port on the side of the NCR2 creates a new entry point into the radio for moister. While NavAtlas says the radio can be splashed and get wet, they also said not to pressure wash it directly. We’d also add that the flap screwed in place from the factory does not have a water seal and thus creates an entry point for moisture. While it is found behind the face of the mounting bracket, it is susceptible to getting wet and we recommend using dielectric grease to seal the connection.
One more note on this interface connection: If you are using the NNT10 with this kit, you will want to remove the interface jack cover BEFORE you install the NCR2 radio into the mounting bracket as the bracket arm does block the screw holding the flap covering the port.
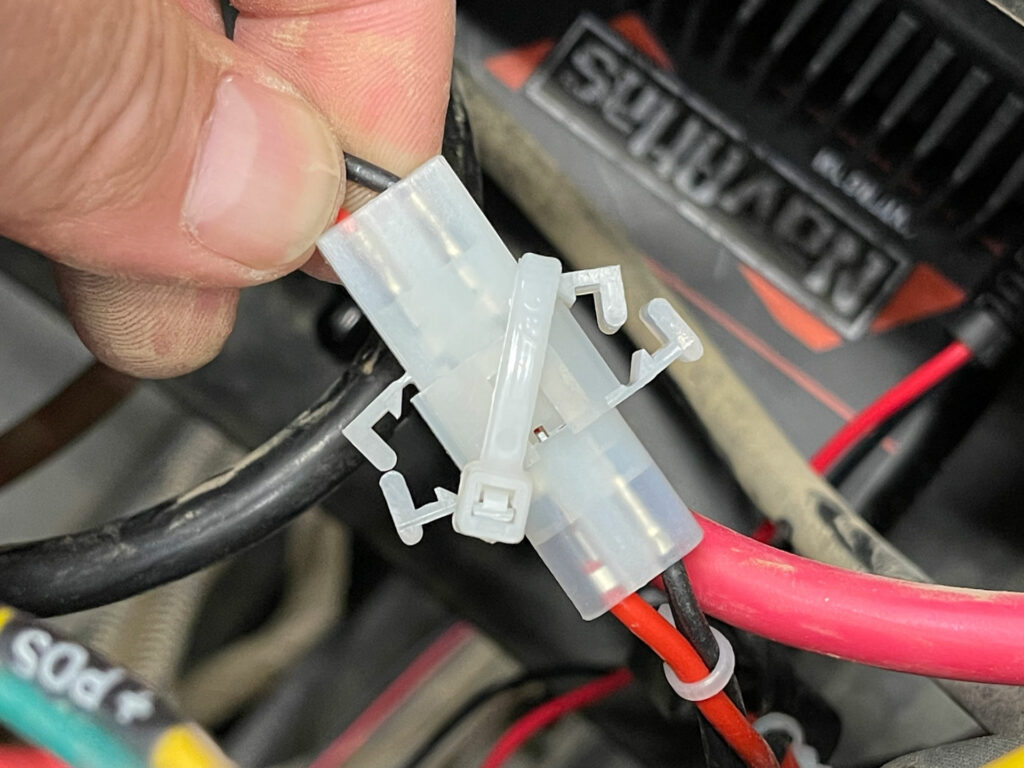
Another quirk of the NavAtlas NNT10 is that the included power lead that connects to your power supply and then to the back of the NNT10 has like-style connections. Normally you’d be happy that they are the same shape and size to connect, but these both have locking “wings”… on both ends… so they can connect as male and female plugs but cannot create a secure connection without the aid of a zip-tie or two.
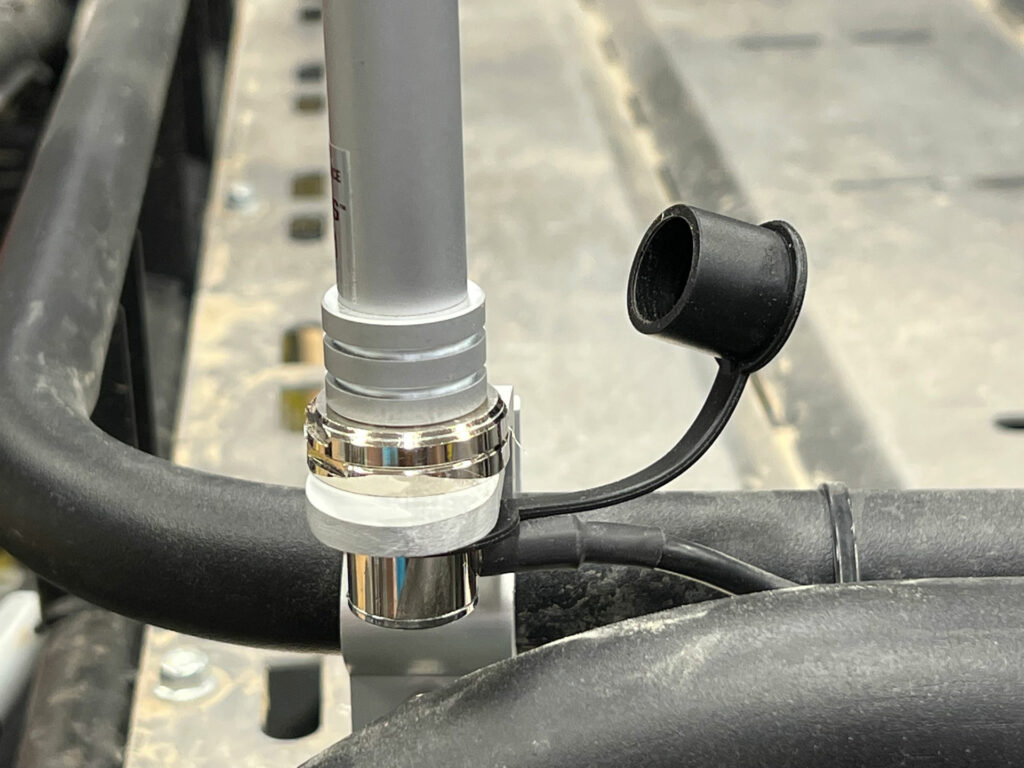
As for mounting the NavAtlas ANT101 antenna, we chose to mount it to the rear of the RZR’s Razorback Offroad cage top rack. This allows the antenna to be as perpendicular to the ground as possible and optimize the reception and broadcast of the antenna. We did have to source a separate mount from a trucking store as the Razorback cage was a smaller diameter than the included 1.75” rollbar mount. Mounting the antenna to the factory cage would place it either at an awkward angle or place it next to LED whips or air pumper which could possibly lead to electronic interference. Mounting the antenna also reminded us that this antenna is NOT flexible and creaked and made scary sounds if we tried to simulate a bend or impact. We recommend looking into a spring mount if you will be using this antenna!
Wiring the ANT101 antenna to the Polaris RZR XP Turbo, we ran the included coax cable down the Razorback cage mounts, through the passenger rear wheel well, down the inside of the chassis (where you would mount rock sliders), up the A-pillar support, and to the NCR2 radio. This route allowed us to not run parallel with any other wiring, kept it well protected from impacts or snags, and afforded us only around 10” of extra length to which we secured to the dash frame in an “S” shape to avoid looping.
Another quirk: If you want to use the included RG8 cap, you will need to cut the retention ring larger to fit around the collar of the right-angled end of the cable. Mounting it any other useful way will defeat the ground between the antenna and the mount.
The Hands-On Experience
Our first go with the NavAtlas NCR2 radio and NNT10 comm unit was pretty straightforward. Before we hooked up any headsets or mics, we first navigated the menus and checked out the various configurations you can do with the units.
NavAtlas NCR2 Mobile Radio
The NavAtlas NCR2 radio was somewhat simple if you are familiar with mobile radios like these. There are a lot of terms that most consumers will not understand and functions that will make no sense if you’re not educated on radios and the various functions of a modern radio system. Instead of going into the technical details of everything, I’m going to focus on what the average consumer would experience.
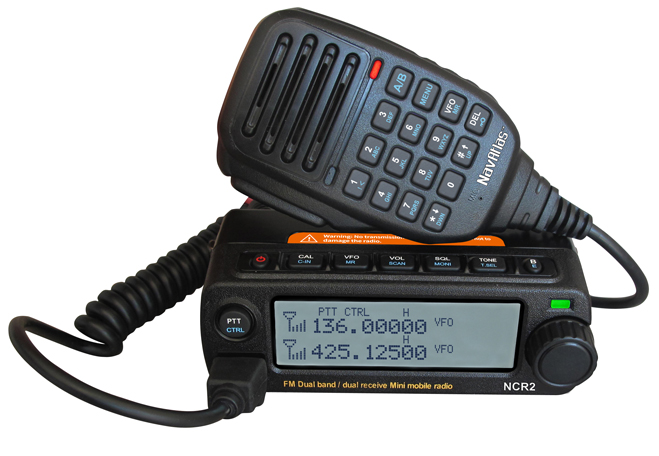
The NCR2 boots up with a large NavAtlas logo and then lands you on the dual-band screen that displays your two selected channels to monitor. There is an “A” or “B” presented that tells you which band you’re defaulting to transmit on as well as the selected transmit channel will appear above the second channel being monitored.
The stored channel number along with the stored channel name are presented but not the frequency. This was my first go at wanting to change the default configuration. On other radios, you can quickly see what frequency you’re listening to or broadcasting on. This is very important when trying to communicate which frequency you’re on to a friend, event worker, service agency, or if you’re friends simply have a different brand radio with a different set of presets. On the NavAtlas NCR2, you can go into the settings and change the display to a handful of different displays but none of them present the channel name and frequency together; the only one that makes it easy to communicate with others! If your buddy has a different brand radio that labels a channel CHKRS2, and your radio has CHKRS2, you have no way of identifying this preset as ACTUALLY being at 151.505 MHz. This compounds issues especially if using tones etc. to keep the conversation limited to those in your group.
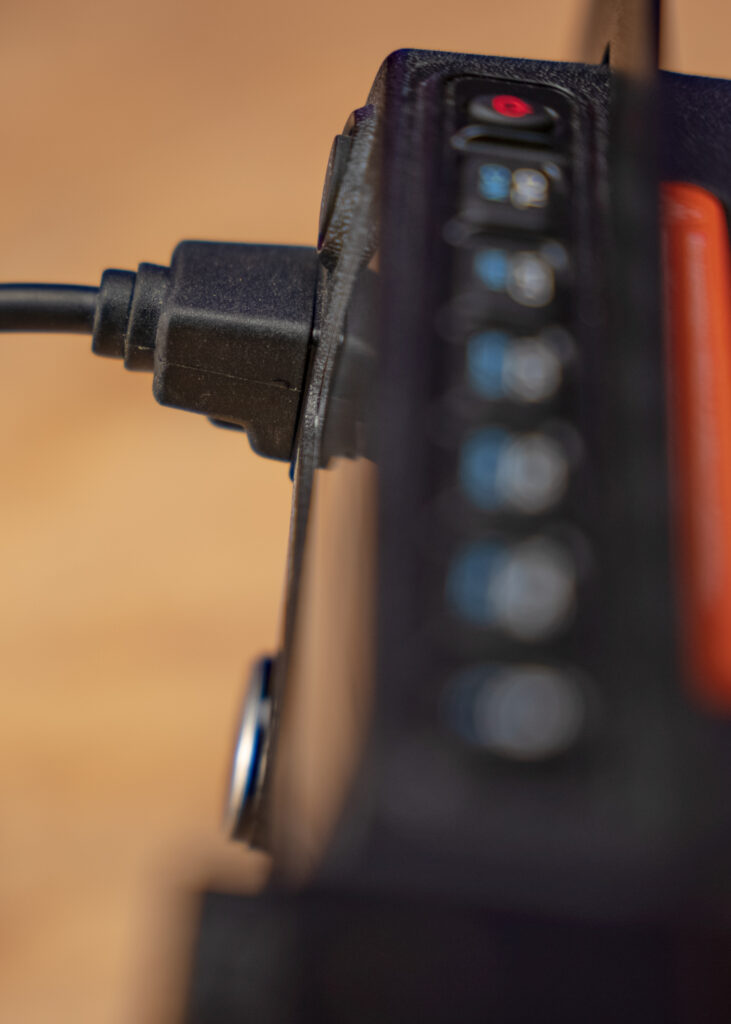
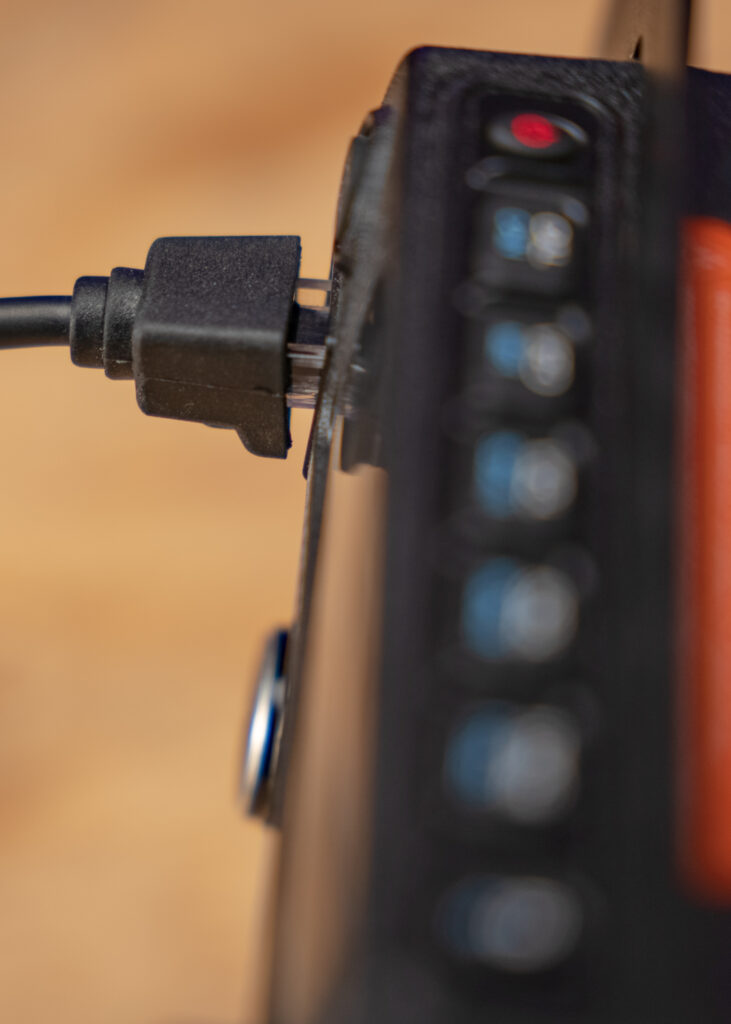
Next, I moved on to the handheld microphone/speaker/keypad. These types of handheld units are great as it gives you quick access to typing in custom frequencies or channel numbers, allow you to hear incoming transmissions while outside of the vehicle, and allow you to transmit quickly without putting on a headset or helmet. This handheld is connected to the NCR2 unit by way of a standard (by modern expectations) RJ-45 connection. This is the same connection as a network cable that connects your PC to your internet router. This eight-pin cable is great if it makes a solid connection.
Unfortunately, a solid connection was not present. There is so much slop in the connection that the handheld unit shorts out unless held into place perfectly, which in this case gravity works against you. This loss of connection was so bad that it made it completely unusable or remotely reliable. This shorting of the signal wasn’t a bad cable, bad handheld, etc… it was literally a bad implementation of the jack retention mechanism. Along with the slop, the cable’s “boot” that is supposed to keep dirt and moister out of the jack does not make a positive connection leaving a lot of gap between the boot and the NCR2 once gravity pulls the cable downwards.
NavAtlas NB200 Headset Experience
Moving on, I realized that this unit will completely rely on the use of the NavAtlas NB200 headsets and/or NH100 in-helmet configuration. Excited to listen to the quality of these headsets and in-car comms, as a proper nerd would do, I first connected my iPhone to the NNT10’s 3.5mm TRS music jack via a Lightning to 3.5mm audio dongle and then connected the NB200 headset to the front of the NNT10. I was puzzled as I didn’t hear anything… I checked the volumes on the device and NNT10. I then thought, well maybe the interface cable connecting to the NCR2 was the problem, but it wasn’t. I tried with the NCR2 off/on, and checked everything. Nothing worked.
I then had a wild idea to plug the headset in the back of the NNT10 instead of the front jacks. BINGO! I could hear the music and using the PPT button on the NB200 headset triggered communications over the radio. This was puzzling… why would the front jacks not work but the back would. I thought this might be because they only intend on the NNT10 to be used with the radios and so you wouldn’t want the front jacks… But that doesn’t really make sense. It would make sense that they expect you to route headset extensions to the back seats in a four-seat UTV, but the front passengers, or two-seat owners, might very well want to use the front jacks and not have to route new paths through their side-by-side, or have extension cables hanging in the cab when not in use.
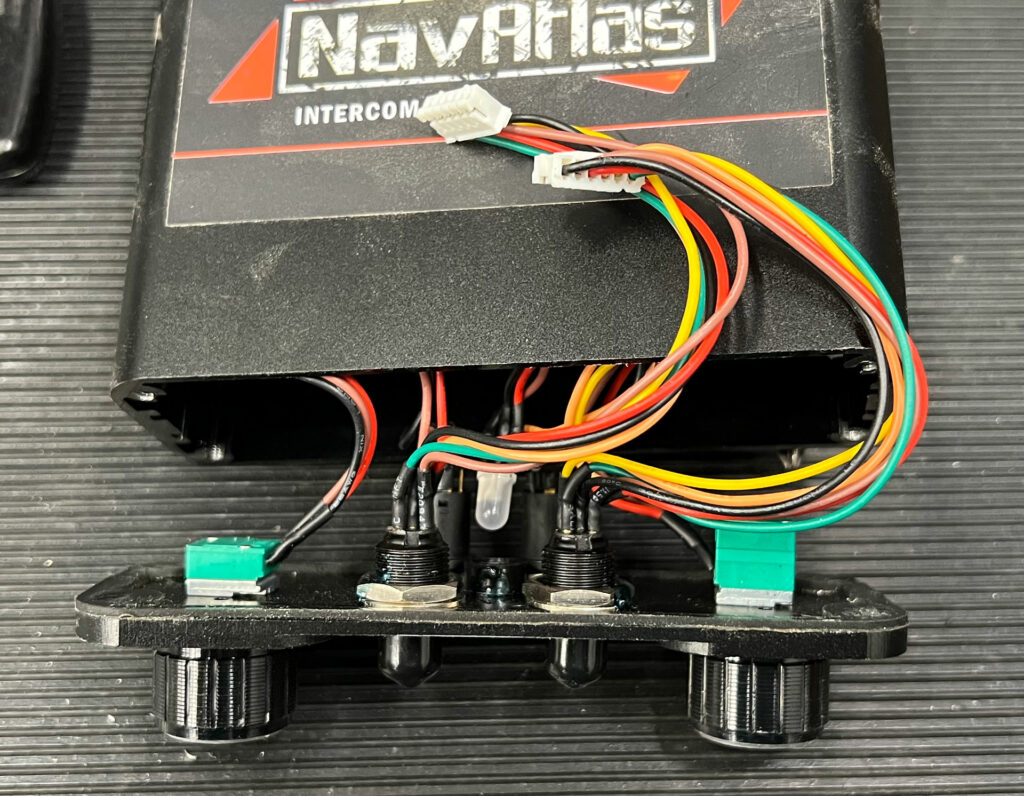
I took the NNT10 apart and found that the front jacks have the appropriate connections to connect to the PCB, but rather are not connected to anything! The rear connections are connected and have the same connection type. If the front connections could actually reach the rear of the PCB, they would probably work, but no consumer is expected to disassemble their brand-new unit, custom crimp and extend small wires and reconnect jacks that should already have been connected. Even if this was the case, NavAtlas is wasting money on manufacturing costs that do not need to exist if they’re not going to be hooked up or easily switched. This is all also not mentioning that you’re adding two more entry points for moisture into the NNT10 unit for no reason.
While I had the NNT10 apart I did confirm that the front and rear of the unit did feature a rubber gasket, so at least it has that going for it.
NavAtlas NNT10 Music Playback
Now that the headsets were working, I could hear the music I was playing. To the NB200’s credit, they didn’t sound half bad! They have a very flat sound curve that is not amazing, but not offensive. There is no bass boost or treble sparkle, but these are meant for comms with the side benefit of listening to music in between while remaining on a budget. While listening to music, if a VOX trigger happens the music does fade down and then back up which is nice. I did not get a chance to test the second 3.5mm TRRS jack for phone calls etc, but I’m assuming it works similar to the music jack and simply sends the NNT10’s VOX audio to the phone’s microphone input.
NavAtlas NNT10 VOX Functionality
I moved on to test the in-car comms. Since the headsets would require the PPT to activate the radio transmission, you would be relying on the VOX functionality to talk to each other while in the car. What VOX does is gate (mute) out the audio signal from your microphone until the volume reaches a specified level (designated by the VOX knob on the front of the NNT10) to which then it opens the gate (unmutes) and you can hear the transmission across all headsets connected to the NNT10.
While I was in the quiet shop, with the vehicle not running and without any other sounds around me, I tested the VOX knob sensitivity and to what levels the microphone would cut in and out. Right away there were issues with the translation of the knob’s position and the level it was supposed to release the audio gate. From zero, it would jitter from closed to open. As I turned it up it would stop jittering and stay closed. With the headset microphone directly on the side of my mouth, I would have to have a very loud voice, almost yelling, to get the gate to trigger open. There was only a single spot on the knob’s travel that would actually gate the audio properly while almost yelling to get the gate to open. Setting the VOX to any higher setting would just leave the gate open… even with the room and myself completely silent. If you are yelling to communicate to your co-driver… what’s the point of the comms? If the mics just stay open the whole time, what’s the point of VOX?
NavAtlas NCR2 Transmission/Reception
Moving on I tested the radio’s transmission and reception with the headsets. Honestly, the transmission and reception of audio were fairly decent. Due to a stagnant winter and a slew of delays in our schedule, we were unable to do mountain range tests with this unit so we cannot speak to the distance claims or VHF/UHF comparisons of the NCR2. What I can speak to is the communications between the NHR1 handhelds and the NCR2 mobile radio within a mile of our garage. Communications were clear, mostly noise-free, and I would say acceptable for a 20-watt mobile radio and 5-watt handheld. I’d say if you’re just looking for close group communications and handheld spotters, these units would serve you well. The NB200 headsets isolate most noise from your surrounding environment and the speakers in the ear cups are not shrill or fatiguing. I would reserve any recommendation for this unit to work well in deep mountain environments as it is limited to 20-watts but would work well in vast open environments.
NavAtlas NHR1 Quirks
Since I mentioned the NHR1 handheld radios, let’s dive into those. The handheld has two knobs on top. One is a channel/frequency selection and the other is your volume knob. Let’s start with the volume knob.
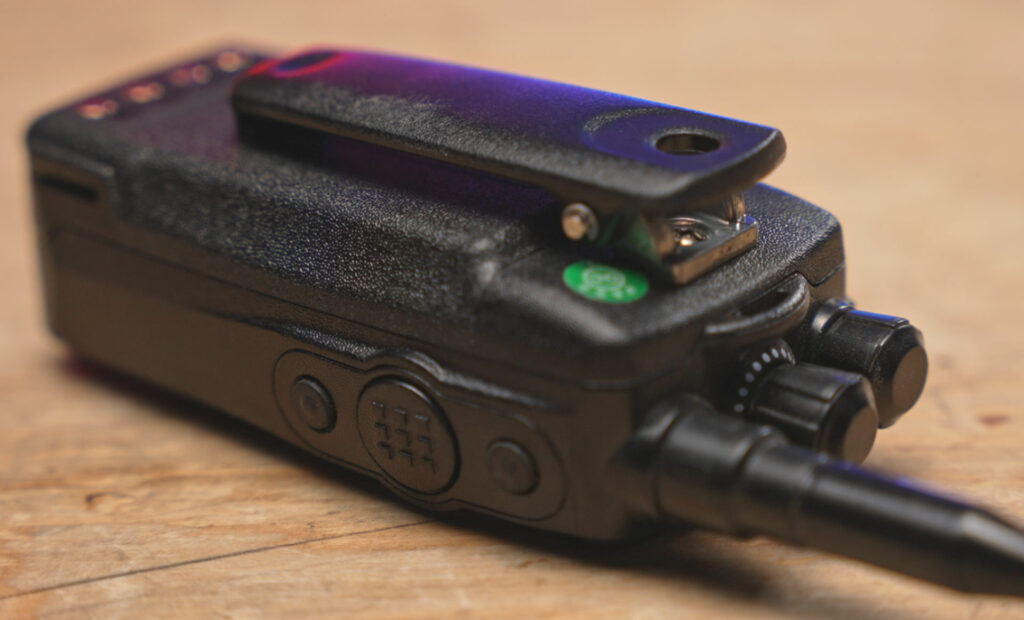
This knob is a digital knob with a clicked-off position. This means the radio translates the movement as a simple increment of one in either direction. That translates to an imprecise and vague feeling movement between audio levels. Additionally, the scale of adding or subtracting volume is not linear. The first few adjustments are around 5-10% whereas adjustments further up the scale are more like 10-15%. Whether or not those visual indicators are the amounts applied to the volume is unknown. I can say that the radio does get very loud and works well in noisy environments.
While we’re on the topic of volume, the NHR1 radio does have a very annoying quirk. By default, any adjustment made on the radio is indicated with an audible tone. Changing the channel, navigating the menu, changing the band, pressing numbers, etc. All of these are indicated by a very loud tone. This tone is not associated with the volume of your radio. That means you can have the volume all the way off and it will still make the tone at volume. This is carried into an external earpiece. If you are using an earpiece to be hands-free, those tones will also blast into your ear canal. There is a menu setting to turn this tone completely off but there is also an option to set the sound level. While there is technically a change in audio level, it is still much too loud for in-ear use even at its lowest setting. Just turn it off.
I used these handhelds also while at various offroading events. Having a handheld radio with you teamed with an earpiece can be a lifesaver at times. As I shoot photos and videos, assist others with events, and generally like to listen to event or race team conversations, an earpiece is crucial to my workflow. Using the NHR1 with an earpiece was mostly a good experience. The audio output was good and there was no distortion. The microphone was pre-amped decently and others could hear me well.
To quickly speak to the menu and interface: I really like the full-color screen and having real text instead of LCD crystals found on other radios. The screen was bright and legible and the buttons were somewhat firm but worked well.
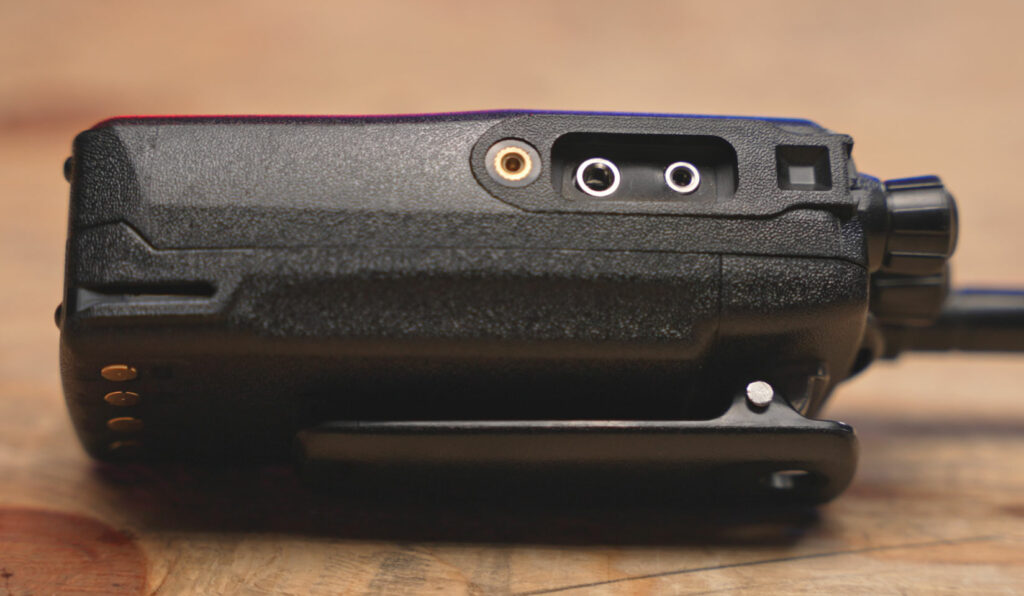
The first issue I have with the NHR1 is that the audio interface jack is covered by a hard plastic flap that is screwed down. This means that you either leave it off or keep it covered. There’s no quick swap in the field or on the trail. This leaves the jack open to dirt and water. Additionally, the flap is brittle and will not survive an impact if you drop it down some rocks or receives an impact. Other handhelds on the market use a rubber flap which is preferred. Additionally, we almost instantly had sand stuck under the transmit button of the radio. This is usually referred to as a rouge radio at events and requires everybody to change frequencies or find the rouge radio and turn it off. We never dropped the NHR1 in the sand! The sand was from riding back and forth in the UTVs while it was clipped to my waist. This essentially made the first NHR1 radio useless during an entire week at an event until I could get to an air compressor to blow out all the crevasses of the radio.
Issues to Know About
During testing, I tried a lot of different configurations and setting changes, etc. As an average consumer, sometimes you change something that gets you into a difficult moment of frustration and you simply want to start over from scratch. During my testing, there were several times when I thought the easier way to resolve something was simply to do a factory reset, but I hesitated and would take the time to revert back the thing(s) I had changed. Then I figured why not, the consumer would probably do this exact thing. So, I factory reset the NavAtlas NCR2 mobile radio back to factory defaults as it would be a good way to film the radio in its default configuration for this review.
DO NOT RESET YOUR NAVATLAS RADIOS!
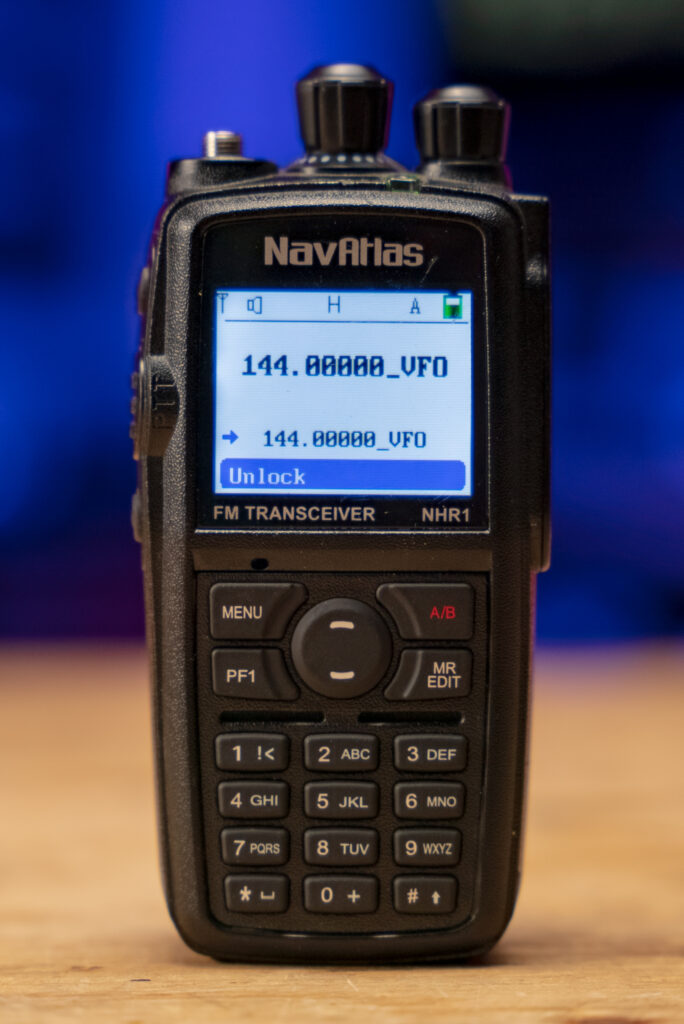
Upon confirmation that you’ve reset the radio, the unit will power cycle and display the NavAtlas logo, just like when you received it. Following the logo, you land on the dual-band monitoring screen where it shows you the channel numbers and stored names of the selected channels. To my surprise, I was seeing two bands of “144.00000_VFO”! I checked the display mode and changed it back to Channel & Name, but then was greeted with an error that said “NO Vailed Chann”. The factory reset, while maintaining the NavAtlas logo, resets the radio to factory programming… not NavAtlas factory programming, the REAL factory programming. I lost all of the custom licensed channels to broadcast on in the 151.000 MHz range (ie: CHCKRS2, etc.)! What does “real” factory programming mean?
The Real Manufacturers
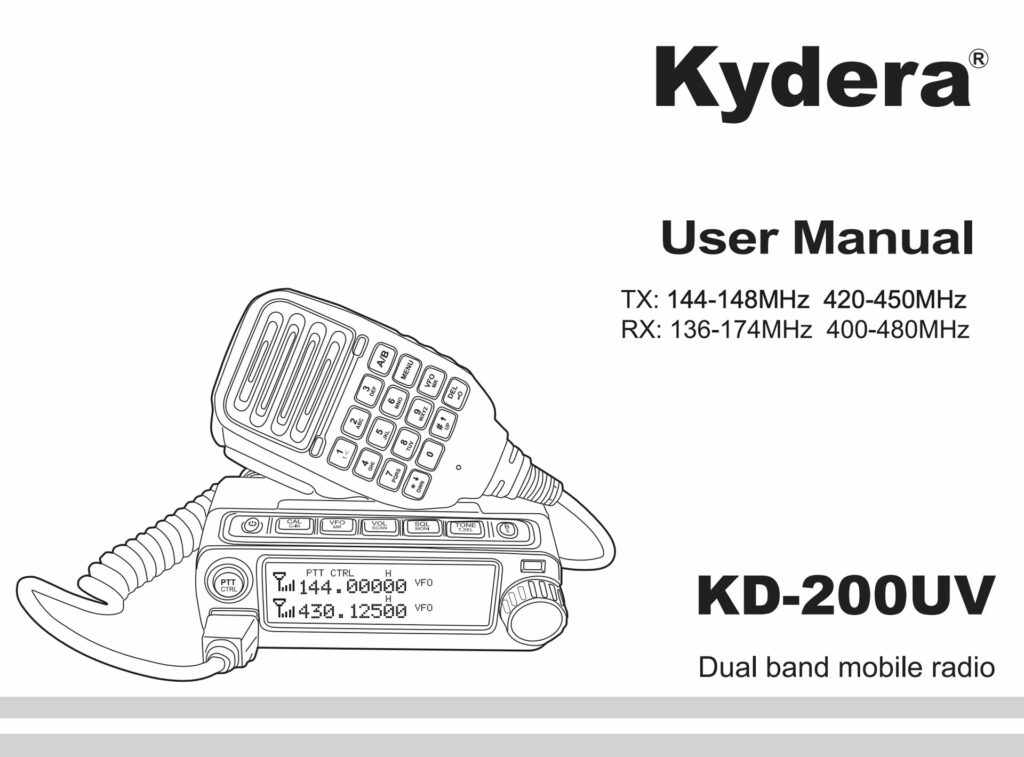
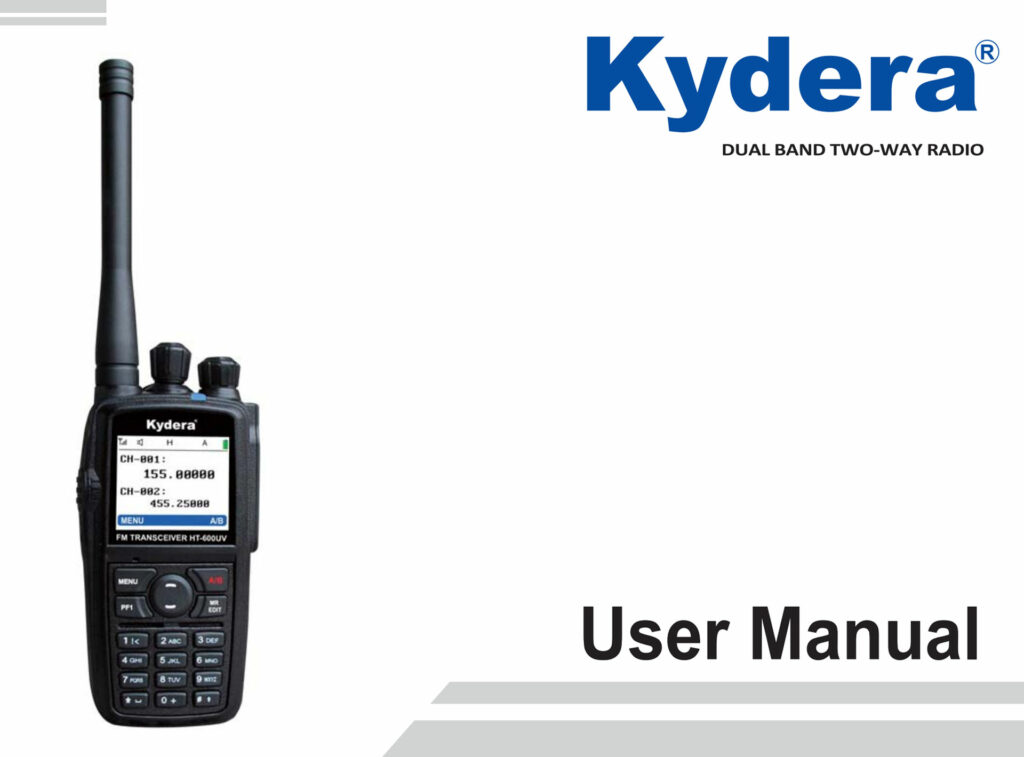
Radios are not an easy item to develop or manufacture. As a matter of fact, there are very few factories in the world that make radio chips, not to mention the actual radios. Most radios are manufactured in common facilities in China and are white-labeled to various brands. In this case, NavAtlas has purchased these radios from Namsung America, Inc. which wholesales for Fujian New Century Communications, better known as Kydera or KYD. The NavAtlas NCR2 is actually a Kydera KD-200UV mobile radio and the NHR1 is actually a Kydera HT-600UV handheld radio.
Now, let me be clear: There is NOTHING wrong with this white labeling of products and selling them as a different brand. Businesses have been doing this for hundreds of years across all products lines, and some of the most influential brands in the offroad space do the same exact thing to varying degrees of transparency. The truth is, you cannot make a radio on your own without it being very expensive and/or large. This is compounded if you want to add modern digital features. I do NOT hold this against NavAtlas, it’s just the way things work in the radio world.
The Customer’s Expectations
Radio manufacturers have to abide by government regulations of radio frequencies, including the brands that white-label their products. The United States’ FCC requires that radios not provide access to broadcast on unlicensed channels. There are tons of channels outside of that range that you can obtain and sell a license to broadcast over via your licensed products. That is how we have this review’s popular example, “CHKRS2” operating in the 151 MHz range. The default programming for Kydera reverts back to the FCC-regulated defaults of only allowing broadcasting between 144-148 MHz VHF and 420-450 MHz UHF and is void of any NavAtlas programming and thus licensing. This would be expected if we (assuming the consumer role) purchased a Kydera radio from a radio dealer. If we purchased a radio from NavAtlas, with the NavAtlas part numbers, the NavAtlas logo on the boot screen, and the added cost of the included licensed programming (the real reason to buy from a white label reseller outside of customer service)… we’d expect the “Factory Defaults” to be exactly how it was received out of the box, not how the “manufacturer” received it at the port.
Unable to Reprogram NavAtlas Radios
Knowing what base model radio these are I figured I would simply connect the radio to my USB interface cable, fire up CHIRP radio programming software and reprogram the unit. Unfortunately, CHIRP does not have a profile for the Kydera radios as of April 2022. They do have a couple of models unrelated to the review units, but not anything to where I could download/upload programming to the NCR2/KD-200UV. Are there other methods and software that might be able to program these radios? Probably, but they are not generally available to the public and even then, I don’t know if the program is available outside of NavAtlas HQ.
Now having experienced a complete loss of all custom programming and thus lost of the license to broadcast with the NCR2, I thought I would try the handheld NHR1s. Again, a factory reset retains the NavAtlas boot logo, but none of the licensed programming or channel names, nor could I download/upload programming to the handheld.
What does that mean to you the consumer? This means that if you complete a factory reset of your NavAtlas radio, you will lose all custom channel names and programming which is licensed to NavAtlas to resell to you the consumer. Your radios will only be able to broadcast between 144-148 MHz VHF and 420-450 MHz UHF as required by the FCC, even though the radios are capable of 136-174 MHz VHF and 400-480 MHz and were sold to you the consumer with licensed channels pre-programmed. The programming to broadcast on “CHKRS2” in the 151 MHz range, for example, is specifically licensed to NavAtlas (and other brands) in specific areas of the country.
I am not going to get all the way into the radio licensing requirements to use these radios, the history of other brands being sued, what lines are skirted by various brands etc. What you should know is that if you are licensed to use these radios at all, the license EXTENDED to you via the “manufacturer” to legally broadcast on these channels as they come from the “factory” will be removed/revoked once you do a factory reset of any of these tested radios. The only way to resolve this will be to send the radio back to NavAtlas for reprogramming or replacement.
Final Thoughts
How do we wrap up this review? This is a completely new experience for us. We try to weed out the bad products/companies from the good before selecting review units, and we’re not saying NavAtlas is a bad company by any means. We would rather “confirm through testing” that a product is great and support a good group of industry brothers/sisters, rather than bash a product because it failed and/or the people are not good to work with.
Being the “offroad radio industry,” there really is no depth of companies to pick from. As we saw NavAtlas trying to make moves and grow in the offroad industry, we figured we would try to highlight an underdog and help competition flourish. I feel like we’re highlighting all the negatives in this review, but they are pretty glaring.
Let’s start off with the positives!
The NavAtlas NCR2 is a handsome mobile radio with a lot of features that an average consumer will be drawn to. It is simple to use and operate and features all of the “common” channels people are used to transceiving on with their buddies out on the trail or in the dunes. The handheld microphone/speaker/keypad works great when you hold the connection in place. Does the NCR2 work as claimed out of the box? Yes, and it would be a solid choice if being purchased alongside a more flexible antenna and reliable microphone/speaker setup.
The NavAtlas NNT10 transmits music from your phone to your headsets well and provides good volume to your headsets. The integrated automotive blade fuse is a welcome addition vs. the glass barrel fuses provided on the NCR2 mobile radio.
The NavAtlas NHR1 handheld radios are a great looking/feeling handheld with a lot of promise. The unit features simple keypad functionality, a beautiful full-color pixel screen that is bright and easy to view in direct sunlight, the antenna is removable/swappable, the speaker gets very loud, and the radio has pretty good battery life.
The NavAtlas NB200 headsets have decent comfort, good noise isolation from the outside environment, a microphone boom that stays where you put it, good looks, and easily indexed controls.
The NavAtlas NH100 in-helmet headsets are of decent quality and work better than some of the Amazon units for other manufacturers. They are not as good as the NB200 headsets, but good enough that I wouldn’t shy away from using them if the rest of the ecosystem worked well.
Now the unavoidable negatives…
The NavAtlas NCR2 mobile radio suffers from a number of major flaws in our opinion. The side-mounted audio interface jack is simply not a great solution for the offroad world. This introduces the opportunity for moisture to enter the radio chassis and cause corrosion or worse. The addition of the interface cable to connect the NNT10 adds additional wiring, connections, and bulk to the installation. The more connections, the more possibility for failure.
The use of multiple glass barrel fuses on the wiring harness, which will most likely be buried under non-trivially removed vehicle plastics, makes us wish they had included more reliable and easily sourced automotive blade-style fuses like the ones used in any current UTV’s fuse panel.
The front RJ-45 com jack was a good idea but ultimately a failure to be usable in its current implementation. The handheld microphone/speaker’s built-in magnet is barely strong enough to hold it onto a metal surface at a standstill, definitely not while in motion.
Finally, we cannot overlook the biggest issue that the factory reset strips your programming and license to broadcast (that you are paying for) on frequencies outside of the limited FCC-regulated ranges. This would be somewhat mitigated if you could reprogram the unit, but that is not available at the time of this review.
The NavAtlas NHR1 handheld radio would be an easy recommendation for anybody looking for an easy-to-use personal radio if it weren’t for the buttons getting easily stuck by sand, the quirks with the audio settings, and the same loss of programming and license when you factory reset the radio. I honestly really like the radios, but they are useless to us without the licensed programming or the ability to reprogram them.
The NavAtlas NNT10 in-car communications unit was a failure from the first time I tried to plug a headset into the front of the unit. The front com ports not being connected to the PCB, not even having a place to plug them in manually, and the glitchy/unusable VOX function make the NNT10 an overpriced and awkward paperweight.
The NavAtlas NB200/NH100 headsets seem like a decent set of cans but without any jacks on the NavAtlas NCR2 radio, and the failure of the NNT10, these are pretty much useless without an adapter to a different radio ecosystem. Even if you try to use the NNT10’s audio interface cable to go to a handheld radio, the headsets are 6-pin and the adapter cable is 5-pin.
Conclusion
I’ll be completely honest; I was completely taken off guard by this review. During unboxing, installation, and initial thoughts… I was stoked and was willing to overlook the quirks of the glass barrel fuses and audio interface cable (knowing this isn’t a custom-made radio/comms system). I was willing to buy a different antenna that I could tune to my frequency choices and be more flexible through the trees etc. I wasn’t prepared to be hit with stumbling blocks, from the “factory,” every step after.
I knew going into this that NavAtlas had a white-label radio. I also know that you can’t get things right the first time, every time. Giving NavAtlas and their team the benefit of the doubt, this collection of issues appears to be a lack of application testing and customer experience surveys. There is no way these issues would be unique to me, all at once, across all the products tested.
The base radio used for the NavAtlas NCR2 is a decent, compact, good-looking radio with a critical flaw in the front RJ-45 communications connection. The ball was further dropped when the NavAtlas logo was retained after a factory reset, yet the critical licensed programming was dropped.
The base radios used for the NavAtlas NHR1 handheld radios are solid units and easily recommended with the caveat that you need to keep them in a clean environment… which is the opposite of outdoors. The radio is less attractive knowing you could lose all of your licensed programming as well.
The NavAtlas NB200 and NH100 headsets are of decent quality and are an easily recommended accompaniment to any of the NavAtlas products, provided the connected products work as advertised.
At the end of the day, I’m a guy that would look past minor flaws or quirks. As a technically capable person, I’d even go as far as to fix some of those quirks or flaws if the product provided enough value to justify the expense of time and resources. I ultimately cannot do that for potential buyers and I cannot recommend the NavAtlas NCR2 mobile radio or the NavAtlas NNT10 in-car communications systems to any offroad enthusiast until they choose to update the product lines with reliable and well-tested, quality components.

